Want to create professional videos without the hassle of traditional editing software? Kapwing’s cloud-based platform might be the answer. Here’s a comprehensive guide to help you master this powerful tool and streamline your video creation process.
Digital content is video-dominated, and that’s not changing anytime soon. Whether you’re a content creator, marketer, or business owner, creating engaging videos fast, including short videos for platforms like Instagram and TikTok, has become an essential skill in your toolkit.
At Vidpros, we know not every creator has the time or desire to edit their videos. As a professional video editing service for content creators, we often recommend Kapwing to clients who want to try editing themselves while knowing we’re here for more complex projects or when time is tight.
We’ll walk you through everything you need to know about Kapwing, from core features and pricing to step-by-step instructions for creating and repurposing video content that stands out.
What is Kapwing?
With Kapwing, teams and individuals can create great video content faster. Unlike traditional desktop editing software, Kapwing is entirely cloud-based so you can access your projects from anywhere and collaborate with team members in real-time.
The platform’s core promise is simple: help you create more content in less time by automating tedious tasks and centralizing your video production workflow. Think of it as “Google Docs, but for video”, a collaborative space where everyone involved in the creative process can contribute, review, and provide feedback at the same time. Kapwing helps you reach a global audience by offering features that enable the translation of video content into multiple languages.
Kapwing Features
Collaborative Editing
Kapwing shines in its collaborative capabilities. Multiple team members can edit projects simultaneously and changes are reflected in real-time. No more sharing updated files and keeping everyone on the same page throughout the creative process. Kapwing helps teams stay informed on their project status, enhancing productivity and reducing frustration.
AI-powered video tools
What sets Kapwing apart is its powerful suite of AI-powered features that automate the most time-consuming parts of video editing:
-
Auto Subtitles. Automatically generate subtitles in over 70 languages with customizable styles.
-
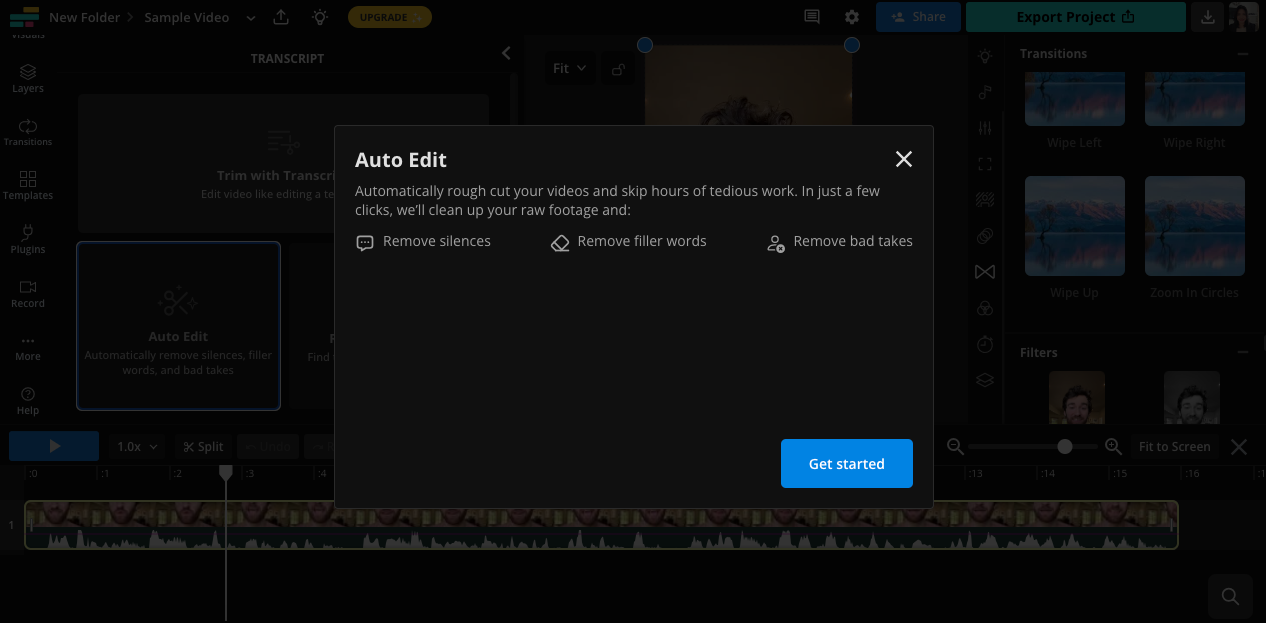
Smart Cut. Automatically detect and remove silences or pauses in your footage.
-
Smart B-Roll. Analyze your video and suggest relevant visual content to complement your footage.
-
AI Video Generator. Create videos from simple text prompts.
-
Script Generator. Generate detailed scripts based on your video topic.
-
Script to Video. Turn written scripts into video content without filming.
-
Voice Cloning and Text-to-Speech. Create natural-sounding voiceovers without recording.
Kapwing also offers an AI-powered tool for background removal, simplifying the video editing process by automating complex tasks.
Brand consistency tools
Kapwing’s Brand Kit feature ensures all content created by your team looks consistent. Store logos, colors, fonts, templates and subtitle styles in one place and anyone can create on-brand content with a few clicks. Its media library offers a variety of royalty-free images, making it easier to enhance your projects without copyright concerns.
Multi-platform optimization
The Video Resizer feature lets you resize content for different social platforms. Convert horizontal videos to vertical formats, the AI will automatically keep speakers centered in the frame, no manual cropping or repositioning required. It is also fully compatible with mobile devices, ensuring you can resize and edit videos seamlessly on your phone.
Kapwing Pricing
Kapwing has several pricing tiers:
Free ($0)
-
Unlimited exports with a watermark in the free version
-
Videos up to 4 minutes long
-
10 minutes of auto subtitles per month
-
720p video quality
Pro ($16/month billed annually, $24 monthly)
-
No Kapwing watermark
-
Videos up to 120 minutes long
-
300 minutes of auto subtitles and translations per month
-
4K video quality
-
Unlimited cloud storage
-
Brand Kit and custom fonts
-
Collaborative workspace features
Business ($50/month billed annually, $64 monthly)
-
900 minutes of auto subtitles and translations per month
-
200 minutes of premium Text-to-Speech per month
-
30 minutes of lip-synced videos per month
-
Voice cloning for up to 2 voices
-
Increased AI feature usage (75 times per month)
Enterprise (Custom pricing)
-
Custom usage limits for all features
-
Priority customer support
-
Dedicated account manager
-
Onboarding and training
-
SAML single sign-on
Getting started with Kapwing video editor
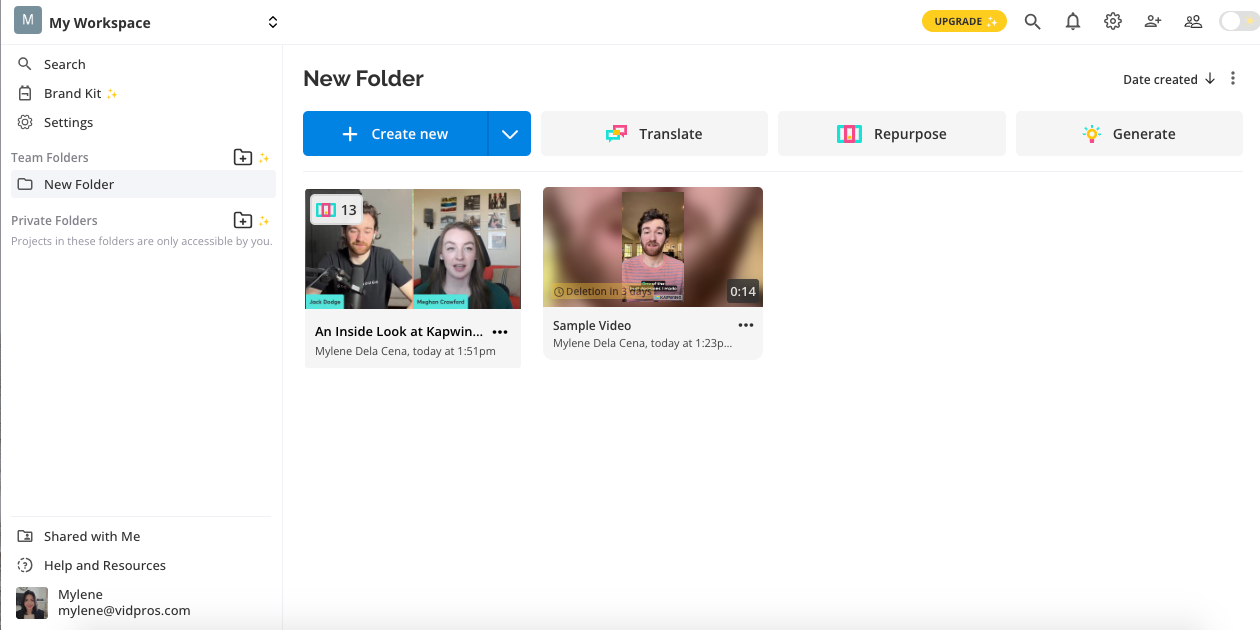
Getting started with Kapwing is easy. Just visit Kapwing.com and sign up. Once logged in you’ll see your workspace where all your projects are stored.

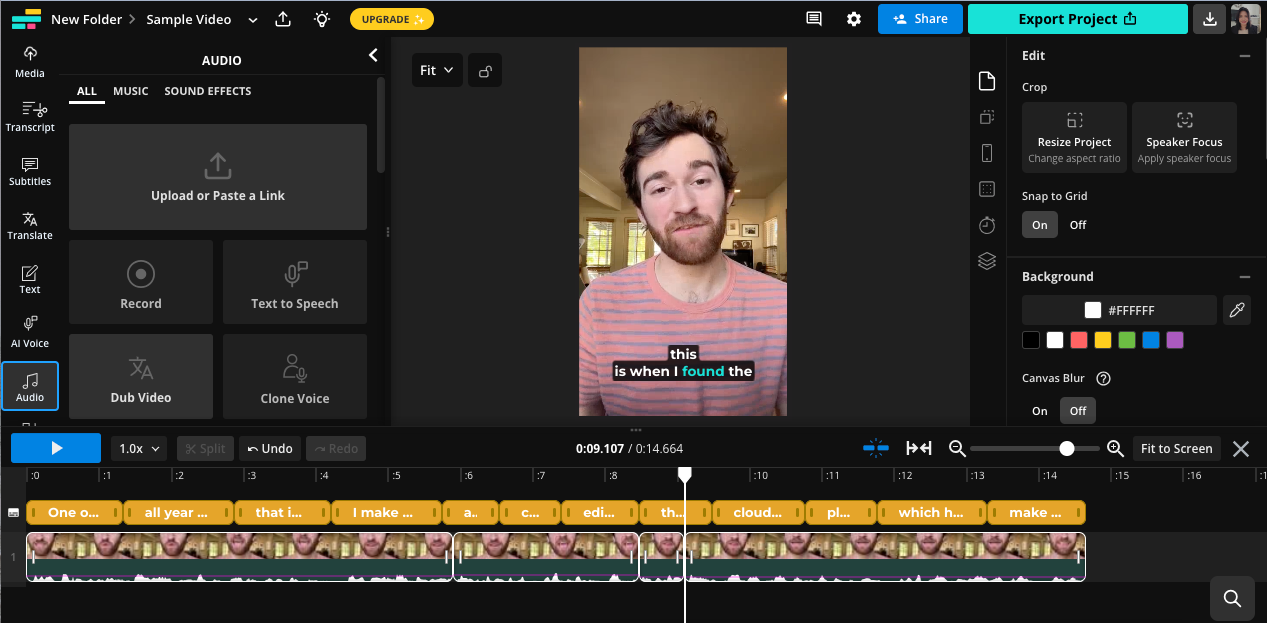
The main editing interface is called the Studio Editor, which has:
-
A central canvas to preview your video.
-
A timeline at the bottom to arrange and edit clips.
-
The left sidebar is used to access media, subtitles, and elements.
-
The right sidebar to select effects, transitions, and other editing AI tools.
You can import media by uploading files from your device, pasting a link to online content, or connecting cloud services like Google Photos.
Step-by-step guide to video editing in Kapwing
Before you start editing, it’s worth noting a few things that will make your editing experience much smoother:
Equipment recommendations
Professional cameras are nice to have but modern smartphones can capture high quality video for most online platforms. Good lighting is key. Natural light works well but consider investing in a ring light or stand light if you’re filming indoors.
Audio quality matters more than video quality for viewer retention. Even an affordable lavalier microphone will improve your results compared to built-in phone or laptop mics. Adding background music can also enhance your video quality by providing a more immersive and engaging viewer experience.
Recording setup
Choose a quiet space with minimal background noise. Make sure your background is visually interesting but not distracting. Test your equipment before recording the full video to avoid technical surprises.
Looking comfortable on camera
Prepare a script or outline to reference while filming. Use Kapwing’s built-in teleprompter to read your video script without breaking eye contact with the camera.
Remember mistakes can be fixed during editing, don’t stress yourself to get everything perfect in one take. Natural delivery will connect better with your audience than a flawless but stiff performance.
Creating a video from scratch
1. Rough cut
The first step in editing is to make a rough cut. Arrange your clips in order and remove any mistakes or unwanted footage. Online platforms make it easy to edit videos without requiring downloads, catering to a range of users, including educators and marketers.
Step 1: Upload your footage to Kapwing by clicking “Create new” in your workspace.

Step 2: Use Smart Cut to automatically remove silences. Select your clip in the timeline, click “Smart Cut” in the right sidebar, and adjust the sensitivity slider to determine how aggressively the tool detects silence.

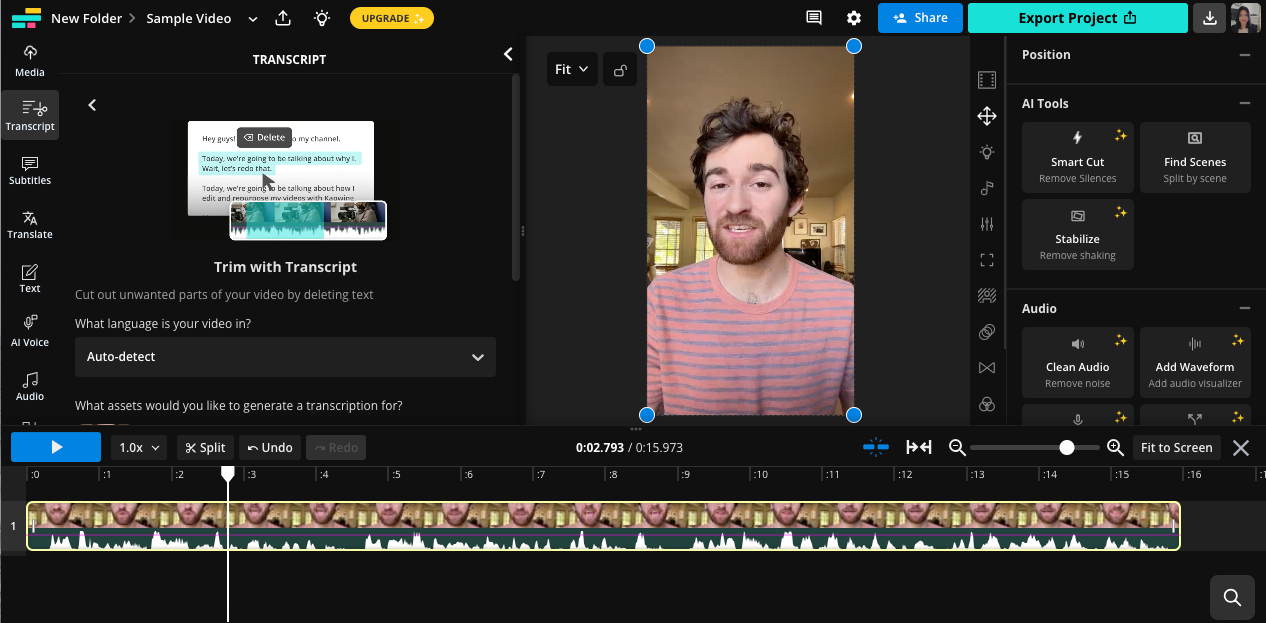
Step 3: Fine-tune your edit using Trim with Transcript. Click the Transcript button in the left sidebar to generate an editable transcript of your video. You can delete any text you don’t want in the final video, and Kapwing will automatically remove those sections from the timeline.
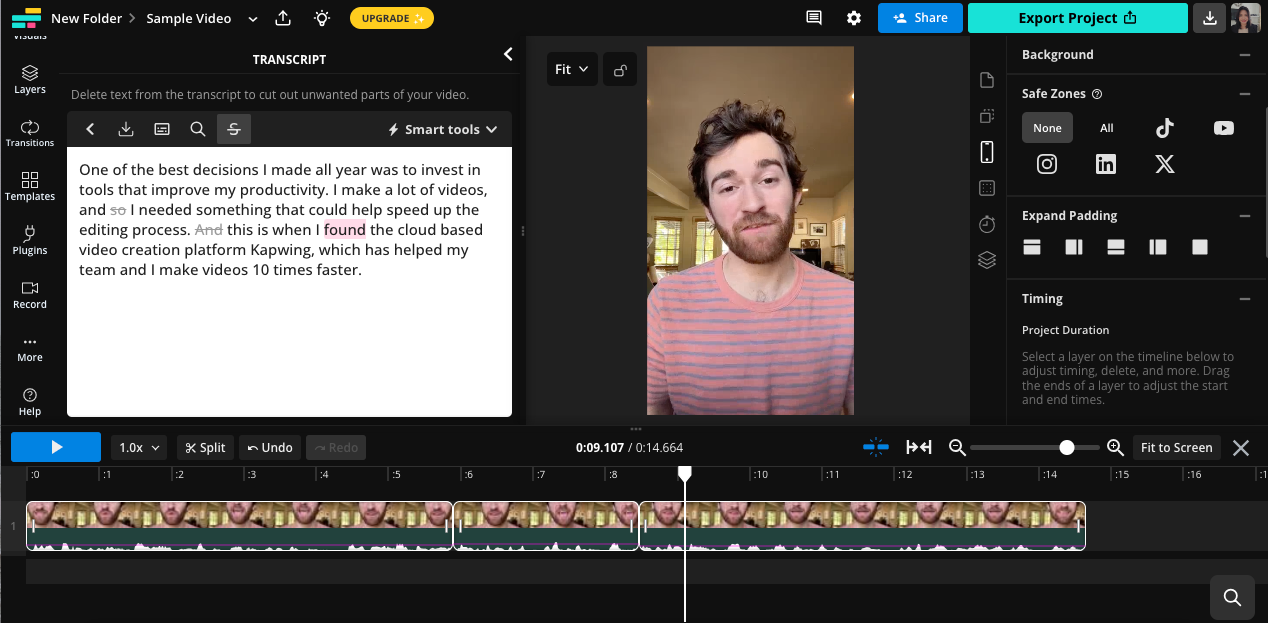
Step 4: Remove filler words quickly by using the “Remove Filler Words” option in the Smart Tools menu within the transcript window.
Step 5: For any additional manual edits, use the split tool (keyboard shortcut ‘s’) to cut clips at the playhead position and the ripple delete function (Cmd/Ctrl + Delete) to remove unwanted sections.
2. Add subtitles and voice-over
For videos with spoken content:
-
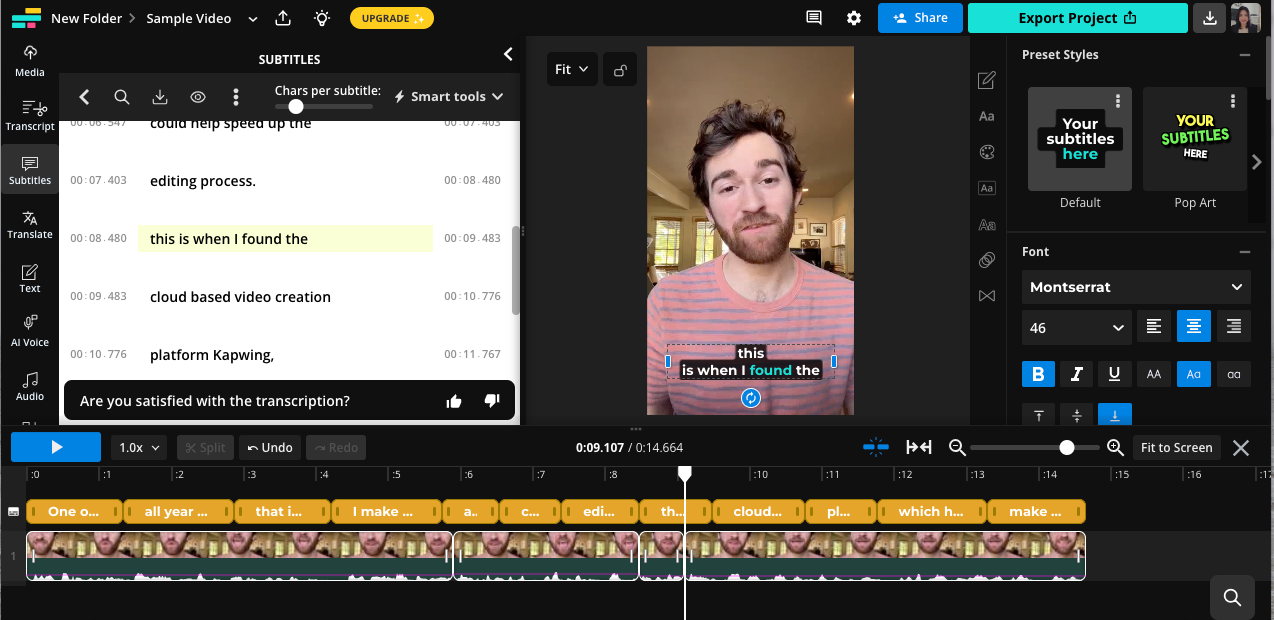
Click Subtitles in the left sidebar and select Auto Subtitles.
-
Choose your language settings and click Auto Subtitle.
-
Customize the appearance of your subtitles using preset styles or font, color, position, and animations.
-
Edit any transcription errors in the subtitle window.
-
For frequently mistranscribed proper nouns, add them to your Brand Kit with Custom Spelling.
For videos without spoken content:
-
Click Audio in the left sidebar and select Text-to-Speech.
-
Type your script and select from over twenty languages and a variety of realistic AI voices.
-
For a more personal touch, use Kapwing’s voice cloning tool by providing samples of your voice.
-
Generated voiceovers will automatically create subtitles that you can customize.
3. Enhance your video
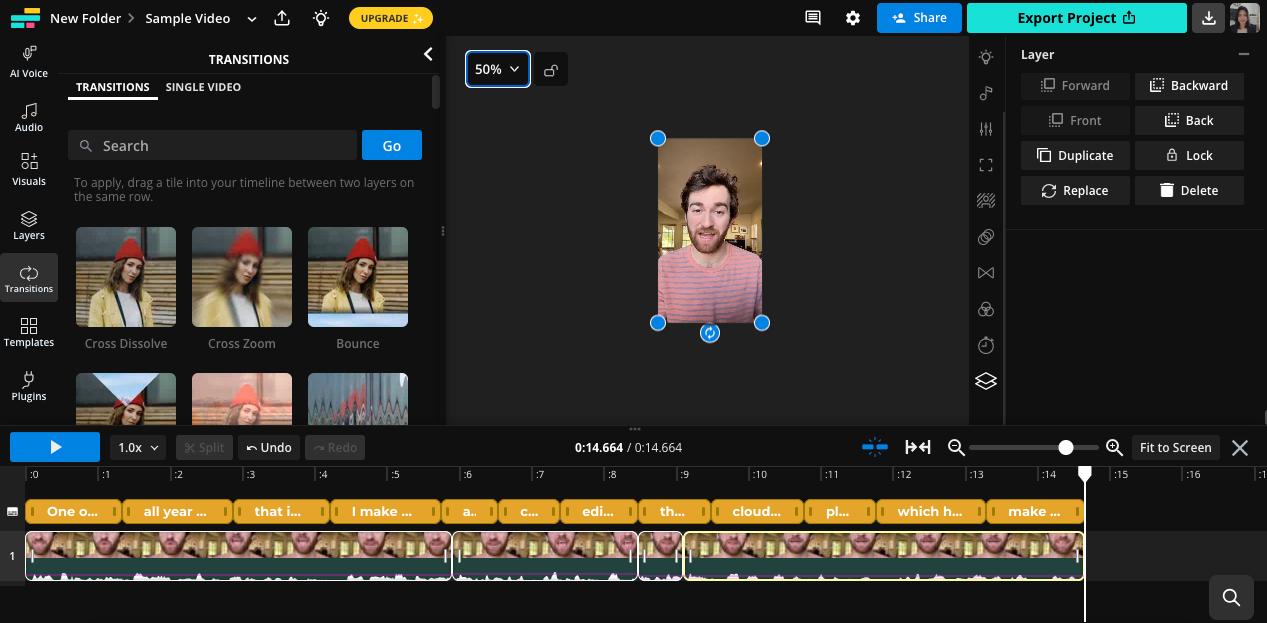
Add transitions:
-
Select a clip in the timeline.
-
Click Transitions in the right sidebar.
-
Choose from over 70 built-in transition effects.
-
Set the duration and position (beginning, end, or both).
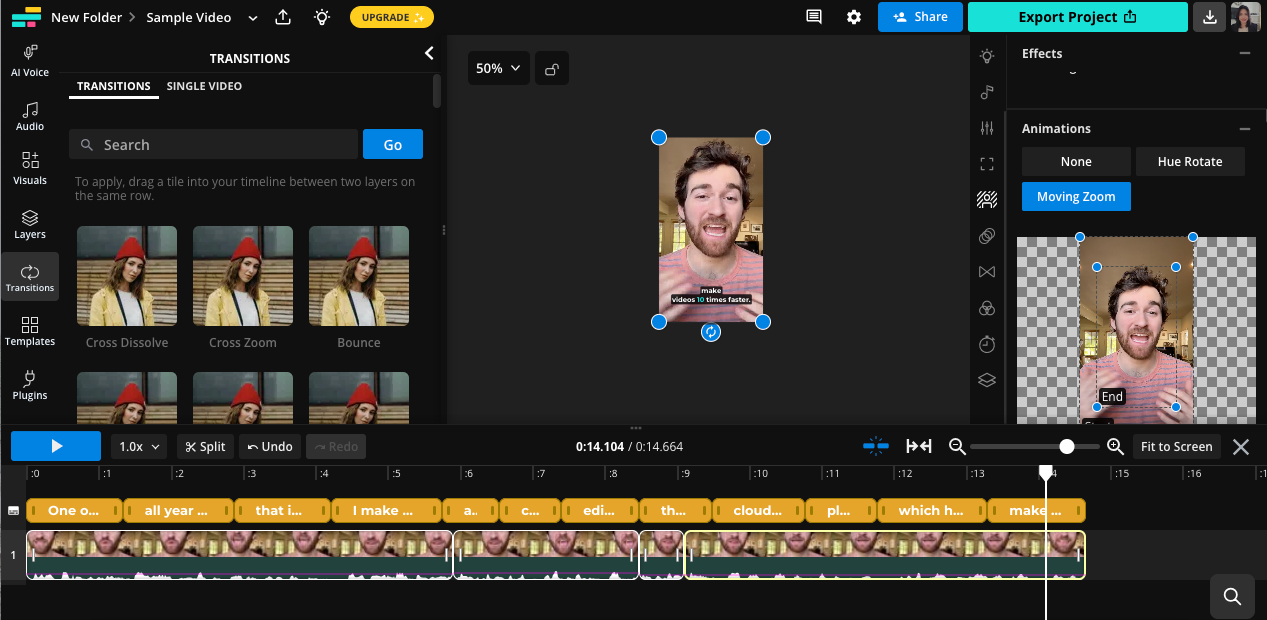
Add moving zoom effects:
-
Select your clip in the timeline.
-
Click Effects in the right sidebar and scroll to Animations.
-
Select Moving zoom and adjust the start and end positions.
-
Quick zooms add emphasis to important points, slow zooms create visual interest.
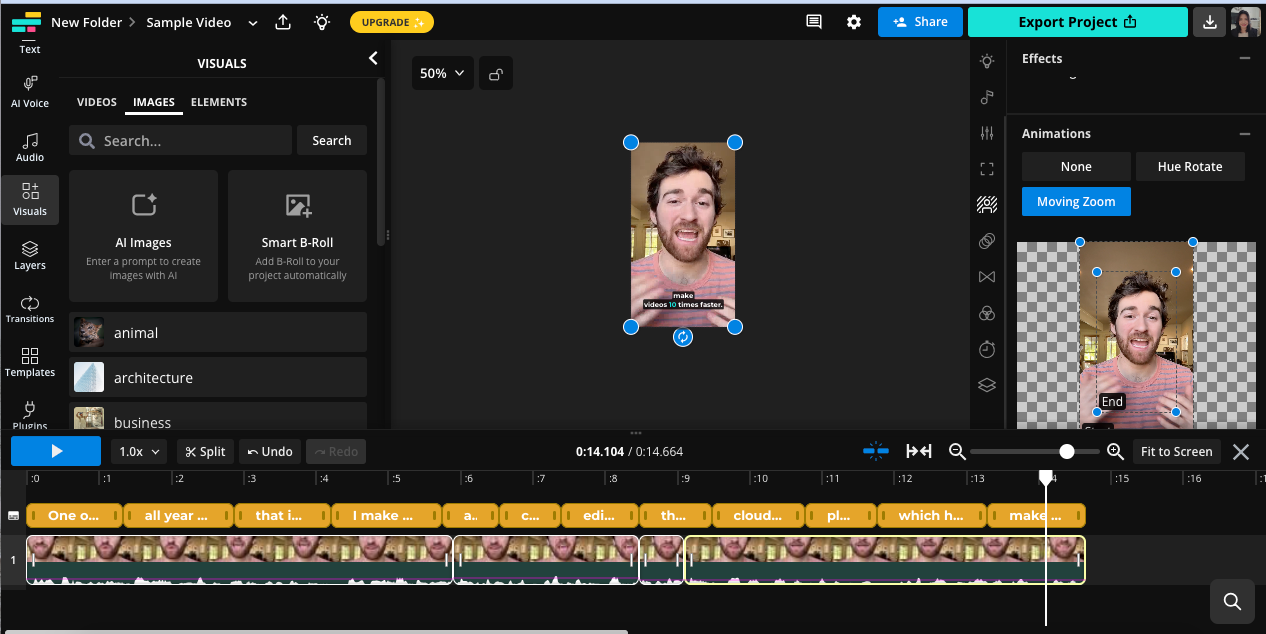
Add overlays and B-roll:

-
Upload your overlay images or videos through the Media tab.
-
Position the playhead where you want the overlay to appear.
-
Add the media to your canvas and position, resize, and crop as needed.
-
Adjust the duration by dragging the layer in the timeline.
-
Use Kapwing’s stock footage library if you don’t have your own b-roll.
-
Try Smart B-Roll to analyze your transcript and add relevant visuals.
Add music and sound effects:

-
Go to the Audio tab and select Music.
-
Search for tracks by mood or browse categories.
-
Adjust the volume so it doesn’t overpower your main audio files.
-
Add sound effects sparingly to enhance specific moments.
4. Finalize your video
Use safe zones:

-
Turn on the Safe Zones filter in the right sidebar to ensure your content is visible on social platforms.
-
Select the platform you’ll be publishing on to see where user interface elements will obstruct your content.
-
Move text, subtitles, and important visual elements within the safe zones.
Getting feedback:
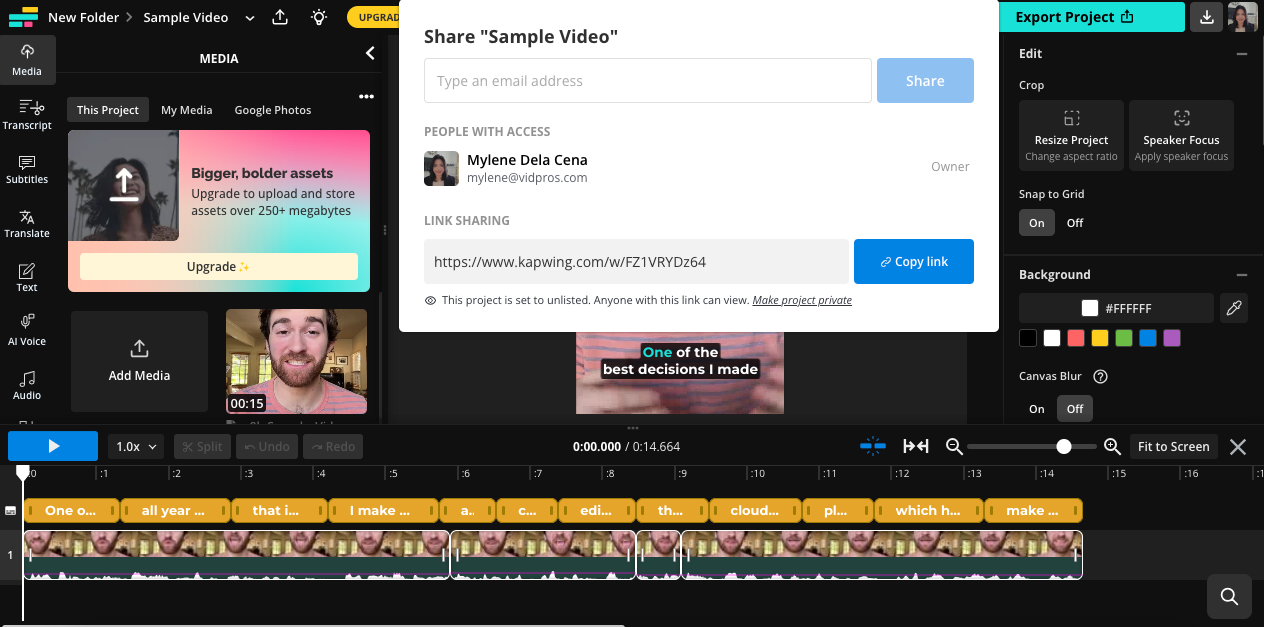
-
Click “Share project” to get a link or invite collaborators via email.
-
Collaborators can comment with timestamps or make direct edits.
-
Respond to feedback and make changes.
Exporting:
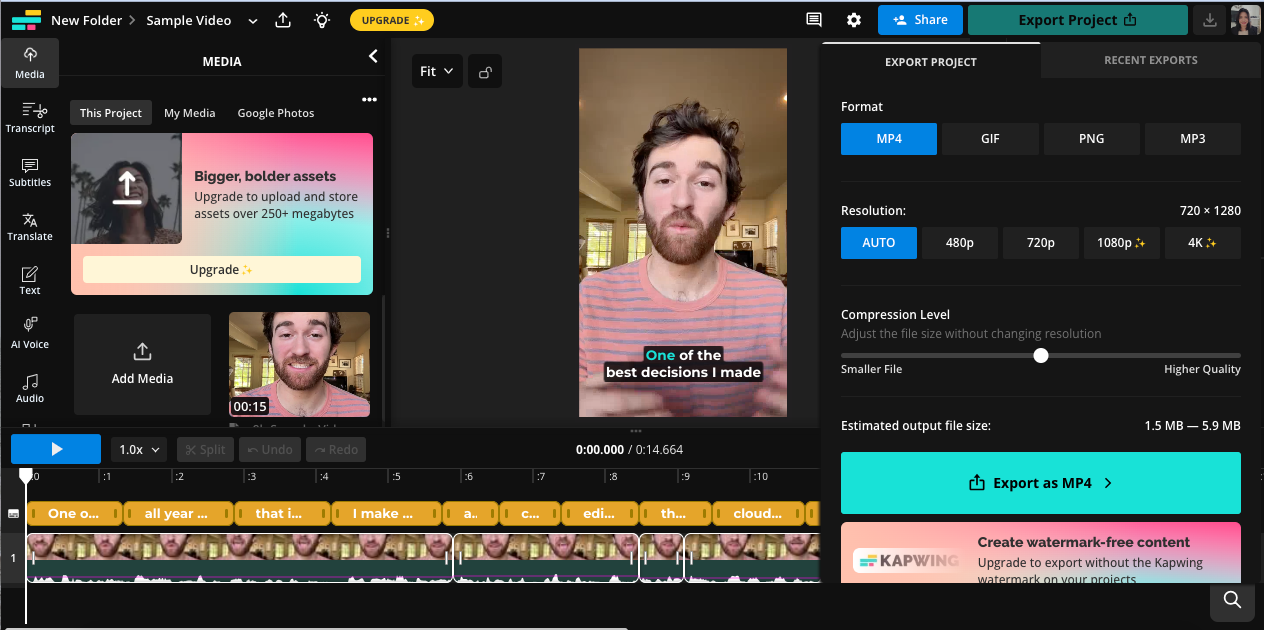
-
Click export when done.
-
Download it to your device.
-
Access export history to retrieve previous versions.
Repurpose existing videos
Repurposing long-form content into social video clips is the most efficient content strategy. Kapwing makes it almost automatic:
Step 1: In your workspace, click the “Repurpose” tab.
Step 2: Upload your existing video or paste the link.
Step 3: Click “Generate Clip,” and Kapwing will analyze your content to find the best moments.
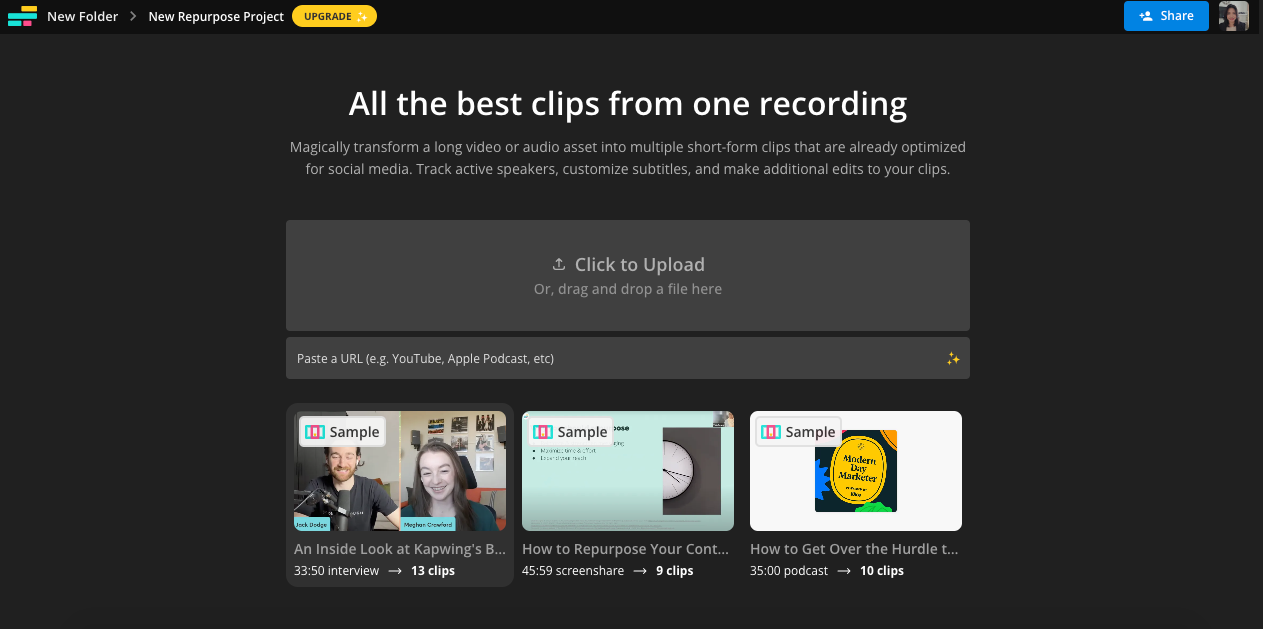
Step 4: While waiting, select your output size and subtitle style. Toggle “Speaker Focus” if you want to keep the speaker in frame.
Step 5: Once clips are generated, review the suggestions and either export or open for further editing.
Step 6: If you choose to edit a suggested clip, you’ll have access to all the standard editing tools to refine it further.
Tips and Shortcuts
Shortcuts
Learning shortcuts will speed up your editing workflow:
-
Cut: ⌘ + X (Mac) | Ctrl + X (Windows)
-
Copy: ⌘ + C (Mac) | Ctrl + C (Windows)
-
Paste: ⌘ + V (Mac) | Ctrl + V (Windows)
-
Delete: Delete key
-
Ripple delete: ⌘ + Delete (Mac) | Ctrl + Delete (Windows)
-
Split: S key
Templates
Use Kapwing AI to apply pre-made templates to your projects or create your own in your Brand Kit. This ensures consistency across multiple videos and speeds up creation for similar content types.
You can also use an image generator to effortlessly create images from text prompts, enhancing your multimedia projects with ease.
Version history
Don’t be afraid to experiment. Kapwing saves versions of your project. If you mess up or want to go in a different direction, you can revert to a previous version without starting over.
Content first
Great content with decent editing will always beat mediocre content with perfect editing. Focus on your message and storytelling first, and use editing to enhance, not distract from, your core content.
Alternatives and Comparison
While Kapwing is a popular video editing platform, there are several alternatives available, each with its own set of features and benefits. Descript and Adobe Premiere Pro are two notable options that cater to different needs and budgets.
Descript is an all-in-one video and podcast editing software that offers a range of editing tools and features. It’s a more affordable option compared to Adobe Premiere Pro, making it accessible to a wider audience. However, it lacks some of the advanced features found in more professional software.
Adobe Premiere Pro, on the other hand, is a professional video editing software that offers advanced features and tools. It’s ideal for users who require high-end editing capabilities and are willing to invest in a more expensive solution. However, its complexity and cost can be a barrier for some users.
Kapwing stands out for its user-friendly interface and AI-powered tools, making it a more accessible option for content creators of all levels. While it may lack some of the advanced features of Adobe Premiere Pro, its intuitive design and efficient tools make it a competitive choice. Its output and export options are also versatile, supporting various formats and social media platforms.
Kapwing is a more affordable and user-friendly option compared to Adobe Premiere Pro while offering more advanced features than Descript. Its AI-powered tools enable users to create professional-looking videos quickly and efficiently, making it an excellent choice for content creators looking to produce high-quality content without a steep learning curve.
When to use Vidpros
While Kapwing is a great tool for many video editing needs, there are times when professional video editing services like Vidpros are a better fit:
-
Time constraints. When you’re too busy to edit your content but need consistent output.
-
Complex projects. Videos requiring advanced effects, color grading, or detailed motion graphics.
-
Professional polish. When presenting to high-value clients or important audiences.
-
Learning curve. When you need videos right away but haven’t mastered editing tools yet.
Kapwing is designed for ease of use and does not require prior video editing experience.
At Vidpros, we see our service as complementary to tools like Kapwing. Many of our clients use Kapwing for social media posts while we handle their flagship content.
Capping off
Kapwing is the democratization of video editing, making powerful creative tools accessible to creators of all levels. With its collaborative features, AI-powered automation, and cloud-based workflow, it’s the perfect solution for teams and individuals looking to scale their video content production.
Whether you’re creating content for social media, marketing campaigns, educational purposes, or internal comms, Kapwing has the tools to streamline your workflow and produce professional results fast. It simplifies the content creation process, making it accessible for individuals and teams alike.
Becoming proficient at video editing takes practice. Start with simple projects and gradually add more advanced techniques as you get comfortable with the basics. And for those times when you need expert help or want to focus on creating rather than editing, Vidpros is here to support your video content strategy.
Video is no longer just one content format among many, it’s becoming the primary way audiences consume information online. By mastering tools like Kapwing or working with professional services like Vidpros, you’re positioning yourself to thrive in this video-first digital era.
Ready to level up your video content? Try Kapwing’s free tier to see what it can do or get in touch with Vidpros to discuss how our professional editing services can help you achieve your content goals without the learning curve.