As a content writer working with professional video editors at Vidpros for a year, I’ve gained insider knowledge on how to edit YouTube videos and the world of YouTube video editing. Through a couple of collaborations with our editing team and research, I’ll show you everything you need to know about YouTube video editing– from pro software to free alternatives.
Need video editing services instead of software? Our Vidpros team can help you edit videos while you focus on content creation. Book a call with us today!
TL;DR Snapshot
YouTube discontinued its built-in video editor in 2017, but creators now have various alternative options.
-
YouTube Studio has basic trimming and enhancements.
-
Pro creators use Adobe Premiere Pro or Final Cut Pro.
-
Free options like CapCut and DaVinci Resolve are available for beginners.
-
Mobile editors like CapCut are popular among short-form creators.
This guide is based on insights from Vidpros’ video editors, who have worked on thousands of YouTube videos across different niches– gaming, tutorials, vlogs, educational content, etc. With real-world examples and practical tips from working professionals, you’ll learn which video editing tools are best for you, your budget, and your skill level.
Whether you’re just starting your YouTube journey or looking to upgrade your video editing tools, I’ve consulted with our editing team to provide accurate and practical information to help you make an informed decision. We’ll cover pricing, learning curve, and system requirements so you have all the info you need to choose the right editing solution for your channel.
Stay with me as we go through each option, with expert tips from our editing team and guidance for creators of all levels. Let’s make your YouTube editing journey less overwhelming.
YouTube Studio’s Editing Tools – The Basics
First, what can you do with YouTube Studio?
-
Trim parts of your videos, like the start or end.
-
Add background music (either from YouTube’s free library or your own).
-
Add subtitles.
-
Add end screens (those clickable boxes at the end of videos).
-
See how your videos are performing with view stats.
You can make these edits quickly and efficiently with just a few clicks.
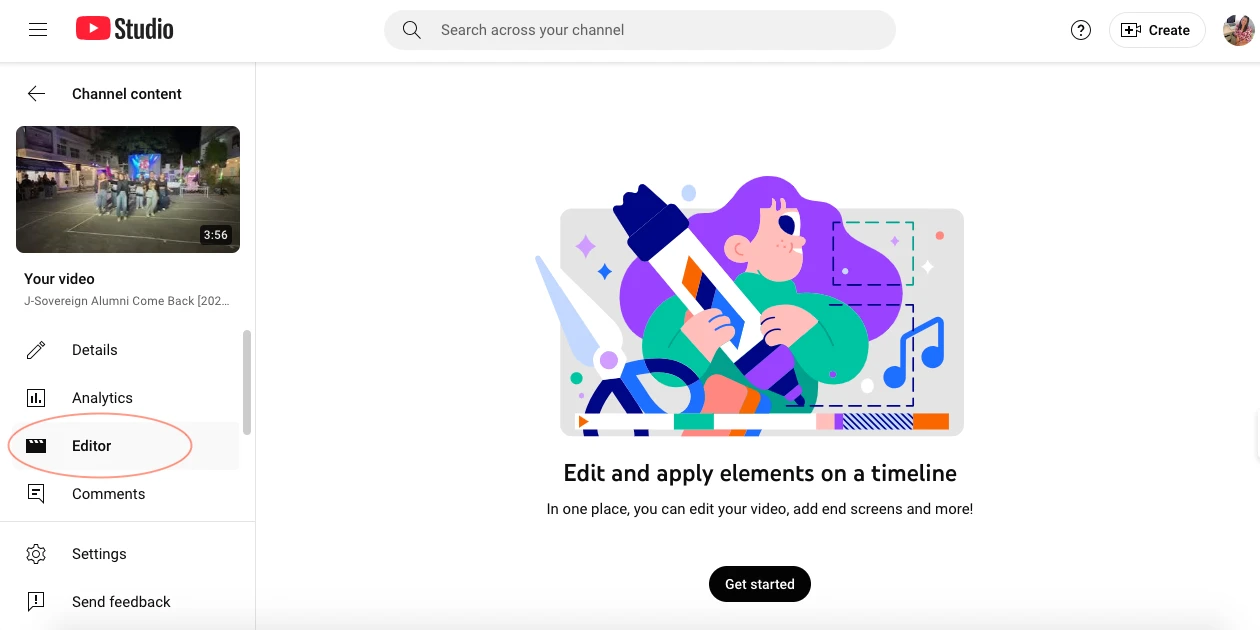
How to get to YouTube Studio:
-
Go to YouTube.
-
Sign in.
-
Click your profile picture at the top right.
-
Choose “YouTube Studio” from the menu.
-
Click “Content” on the left to see your videos.
-
Find your video and click “Editor” to start editing.
The best part? It’s free! Anyone with a YouTube account can use it.
When to use YouTube Studio?
It’s good for quick fixes like:
-
Cutting out mistakes.
-
Adding music.
-
Making changes without downloading special software.
When should you look for other editing tools?
Use professional software (like Adobe Premiere) when:
-
You need fancy effects.
-
You’re working with multiple video clips.
-
You want to do detailed color grading.
-
You’re making professional content that needs to look super polished.
Significant limitations to know:
-
You can’t do complex editing like adding multiple layers.
-
Some editing options will be limited if your video has more than 100,000 views.
-
Once you save changes, you can’t undo them.
-
The editing tools are essential compared to professional software.
YouTube Studio as an essential toolkit. It’s suitable for beginners or quick fixes, but serious creators might want more powerful tools.
Professional Video Editing Software for YouTube
Adobe Premiere Pro

What is Premiere Pro, and what it can do?
-
Its professional video editing software lets you work with multiple video and audio tracks simultaneously.
-
You can color-grade your videos to look more cinematic.
-
It has tons of effects and transitions.
-
You have detailed audio controls to get your sound just right.
-
It works with other Adobe apps like Photoshop.
-
It can handle any video file.
Cost:
-
Not free. You’ll need to pay monthly.
-
Individual plan: $22.99/month if you pay yearly.
-
All Adobe apps bundle: About $59.99/month.
-
Try it free for 7 days.
Why do YouTubers love it?
-
It makes pro-level videos and is the best video editing software for Vloggers.
-
You have total control over everything.
-
There are tons of tutorials to learn from.
-
Adobe updates it with new features.
Is it hard to learn?
Yes, it takes time to get good at this YouTube video maker, but you can learn through:
-
Adobe’s official help guides.
-
YouTube tutorials (there are hundreds of free ones).
-
Online courses on sites like Udemy.
Who uses it?
Some prominent YouTubers who use Premiere Pro:
-
MKBHD (Marques Brownlee) for his tech reviews.
-
Peter McKinnon for his photography/video content.
-
Casey Neistat for his vlogs.
Premiere Pro has every tool you could need, but it takes time to learn how to use them all effectively. It’s an investment in money and time, but if you’re serious about making high-quality videos, many creators find it worth it.
Final Cut Pro (Mac Users)

What is Final Cut Pro, and what it can do?
-
Apple’s professional video editing software (Mac only).
-
It has a unique timeline to keep your clips from getting jumbled.
-
You can work with footage from multiple cameras at once.
-
Handles 360° videos and up to 8K resolution.
-
Detailed color adjustments.
-
Group clips together to stay organized.
-
Compare different versions of a scene to pick the best one.
Cost:
-
One-time payment of $299.99 (not monthly like Adobe).
-
All future updates are free.
-
Try it free for 90 days.
-
Compared to Adobe Premiere Pro’s $22.99/month.
Works great with other Apple stuff:
-
You can move projects from iMovie to Final Cut Pro.
-
It is designed specifically for Macs, ensuring that it runs very smoothly.
-
Works well with other Apple apps for graphics and video compression.
Who uses it?
Some prominent YouTubers who use Final Cut Pro:
-
Sam Kolder (travel videos)
-
Jenna Marbles (former vlogger)
-
Peter McKinnon (photo/video tutorials)
Final Cut Pro has a bigger upfront cost, but if you’re going to use it a lot, it might save you money in the long run. It’s made for Mac users and works incredibly well with other Apple products, which is why many Apple-focused creators use it.
Free YouTube Video Editor Options
CapCut

What is CapCut, and what it can do?
-
Free video editing app for phones and computers.
-
Automatically removes video backgrounds.
-
AI features like auto-captions and voice improvement.
-
There are lots of effects, filters, and transitions.
-
Can change the video speed for slow-mo.
-
Comes with ready-to-use templates.
-
Export high-quality videos (up to 4K) without watermarks.
How to use it for YouTube:
1. Download CapCut from their website or app store.
2. Create a new project.
3. Add your video clips.
4. Edit your video by:
-
Trimming and arranging clips.
-
Adding effects and music.
-
Using AI tools if needed.
5. Set your video size (regular YouTube or Shorts)
6. Save your video.
Pros:
-
Free.
-
Easy to use.
-
Works on phones and computers.
-
No watermarks.
Cons:
-
Missing some advanced features of pro software.
-
It may be slow on older devices.
Tips for uploading to YouTube:
-
Use at least 1080p (4K if you can).
-
Save as MP4 file type.
-
16:9 for regular videos or 9:16 for Shorts.
-
Write good titles and descriptions for your uploads.
Who uses it?
-
Kylie Jenner’s team uses it for social media content.
-
Many TikTok creators use it when they start making YouTube videos.
CapCut is a free YouTube video editor, portable, and has many tools that work well for most basic needs. It does not have all the features a pro studio would want, but it is perfect for YouTube content, especially if you’re starting or prefer to edit on your phone.
Filmora

Free vs. paid:
Free version:
-
Basic editing tools.
-
Watermarks on your videos.
-
10 video export limit.
-
4K and basic effects.
Paid version:
-
No watermarks.
-
Unlimited video exports.
-
Extra effects, filters, and music.
How much?
-
Yearly: $29.74/year
-
Lifetime: $37.49 one time
Is it easy to use?
Yes! Filmora is known for being user-friendly:
-
Simple layout that’s easy to understand.
-
Drag and drop to move things around.
-
Built-in tutorials to help you learn.
-
Suitable for beginners and experienced editors.
Special YouTube features:
-
Easy to set video size for regular videos or Shorts.
-
Quick export settings for YouTube.
-
Ready to use title designs for YouTube videos.
Tips for best quality on YouTube:
1. 1080p or higher (4K if you can).
2. Save as MP4.
3. Higher bitrate = better quality but bigger files.
4. Same frame rate as your original video.
Filmora is not the most expensive, but reliable, easy to use, and with all the features most people need. The free version lets you try it out, but the watermark will make you want to upgrade if you’re serious about making videos.
Free Alternatives
DaVinci Resolve

-
Think of this as the “professional’s choice”. It’s like having an entire TV studio on your computer.
-
It’s free but packs serious power. You can edit videos, color grade, add effects, and work on audio.
-
The catch? There’s a lot to figure out at first.
-
Best for: People who want to create high-quality videos and don’t mind learning the tools.
OpenShot

-
This is like the “friendly neighbor” of video editors, it’s super easy to use.
-
Just drag and drop your videos, add some effects, and you’re good to go.
-
Works on any computer (Windows, Mac, or Linux).
-
The downside? You might struggle with more significant projects, and it’s pretty basic.
-
Best for: Beginners who want to make simple videos fast.
VSDC

-
Think of this as the “middle ground” option.
-
Can handle most of the editing tasks you throw at it.
-
You don’t need to pay anything to use it (no watermarks on your videos!)
-
The interface isn’t very friendly. It’s like trying to find things in someone else’s kitchen.
-
Best for: People who want something more potent than OpenShot but simpler than DaVinci.
Kdenlive

-
This is like the “community-built” editor. It’s free and open-source.
-
It’s powerful and can do most of what professional editors can do.
-
Works like professional software.
-
Sometimes, it can be a bit unstable.
-
Best for: People who want professional features but don’t need the complexity of DaVinci.
If you’re starting out, try OpenShot. If you want to get serious about video editing, go for DaVinci Resolve. VSDC and Kdenlive are the middle-ground options, depending on your needs.
How to choose the right YouTube video editor
Skill Level
-
If you’re new, go for something simple like OpenShot. It’s like using a basic phone camera.
-
If you’re experienced, use more advanced options like DaVinci Resolve, which is like a professional camera with manual settings.
Budget
-
No money to spend? No problem! You have good free options like DaVinci Resolve, OpenShot, and VSDC.
-
Can you spend some money? Paid software usually gives you more features and better support, but expect to pay between $50 and several hundred dollars.
Video Type
-
Making social media videos, how to videos, or tutorials? Basic editors will do just fine.
-
Making movies or documentaries? You’ll need more powerful software with advanced features.
-
Think about where your videos will end up (YouTube, Instagram, etc.), and make sure your editor can export them in the correct format.
Hardware (Your Computer)
-
Check if the software works with your computer type (Windows, Mac or Linux).
-
More significantly, fancier editors need more powerful computers, especially for 4K videos.
-
Make sure your computer is strong enough to run the software smoothly.
Time Investment
-
Some editors are easy to learn but basic.
-
Others takes time to master but gives you more control.
-
How often will you edit videos? If it’s regular, it might be worth learning more complex software.
The most important thing is to be honest with yourself. Don’t get fancy software just because it’s fancy. Get what matches your skills, budget, and goals.
By Content Type
Gaming Content
-
The best options are PowerDirector, DaVinci Resolve, and Filmora.
-
PowerDirector. It’s a great all-around choice, easy to use, and has everything gamers need.
-
DaVinci Resolve. It is for those who want their gaming videos to look super professional.
-
Filmora. Perfect if you’re starting; it’s easy to learn and has AI help.
Vlogs
-
Adobe Premiere Pro. The professional choice works with everything and connects with other Adobe tools.
-
Final Cut Pro. If you’re on a Mac, this is your best bet; it’s powerful and makes sharing easy.
-
OpenShot. Free and straightforward, it is suitable for basic vlogs on your YouTube channel when you don’t need fancy stuff.
Tutorial Videos
-
Camtasia is made for tutorials, records your screen, and lets you add explanations.
-
VSDC is a free option that does everything you need to teach others.
-
Kdenlive. It is free, powerful, and good when you must show multiple things simultaneously.
Music Videos
-
Adobe Premiere Pro. It is best for serious music videos and handles video and audio well.
-
Filmora. It makes it easy to match video with music and has many ready-to-use templates.
-
DaVinci Resolve. For making your music video look stunning with color grading.
Short Videos (TikTok or Instagram)
-
InShot. Perfect for phone editing, made for social media videos.
-
CapCut. Similar to InShot, there are many effects and templates for quick social media posts.
-
OpenShot. If you prefer editing on a computer, it is simple and gets the job done.
The most important thing is to choose the right tool for your specific needs.
FAQ’s
Is YouTube video editor still available?
Yes, the YouTube video editor is still available within YouTube Studio. You can make basic edits like trimming videos, adding music, and blurring faces without re-uploading your content.
What video editor do most YouTubers use?
Many YouTubers use different editors depending on their needs and skill level. Professional editors use Adobe Premiere Pro, Final Cut Pro, and DaVinci Resolve. Beginners use Filmora, CapCut, and online editors like Kapwing because of their user-friendly interfaces and basic features.
Can I edit my uploaded YouTube videos?
Yes, you can edit your YouTube videos after uploading them. The YouTube video editor lets you trim parts, add music, and make other changes without re-uploading the whole video.
Is CapCut suitable for YouTube?
CapCut is a good choice for YouTube editing, especially for beginners. It has effects, transitions, and text overlays that can improve video quality. It’s user-friendly, so it’s suitable for those new to video editing.
Which free editor is suitable for YouTube beginners?
OpenShot and CapCut are good choices for beginners looking for free software because of their user-friendly interfaces and basic features. DaVinci Resolve is also good if you’re willing to invest time in learning more advanced tools, and it’s free.
Why did YouTube remove its editor?
YouTube didn’t remove its editor but simplified it over time. The platform focused on improving the user experience by consolidating editing options within YouTube Studio rather than maintaining a complex standalone editor.
Can I edit in YouTube Studio?
Yes, you can edit in YouTube Studio. The editor lets you trim videos, cut parts out, add music, or blur parts of your video.
What are the minimum system requirements?
Minimum system requirements vary by software, but generally:
-
Processor: Multi-core processor (i5 or equivalent).
-
RAM: 8 GB (16 GB for smoother performance).
-
Graphics Card: Dedicated GPU with 2 GB of VRAM.
-
Storage: Enough disk space for project files (SSD for faster access).
-
Operating System: Compatible with the software (Windows 10/11 or macOS).
These will make your system ready for video editing.
Capping off
Let’s summarize the best YouTube video editors for your needs:
For Beginners:
-
CapCut. If you want it free and easy to use, especially on your phone,
-
OpenShot. For simple desktop editing without spending money.
-
YouTube Studio. Suitable for basic cuts and tweaks after uploading.
For Serious Creators:
-
Adobe Premiere Pro. For professional YouTubers who need total control.
-
Final Cut Pro. If you’re on Mac and willing to spend once.
-
DaVinci Resolve. Professional editing is free if you’re eager to learn.
For Specific Content:
-
Gaming. PowerDirector or DaVinci Resolve
-
Vlogs. Adobe Premiere Pro or Final Cut Pro
-
Tutorials. Camtasia or VSDC
-
Short-form. CapCut or InShot
Choose an editor that matches your current skill and needs, not what your favorite YouTuber uses. Start with something simple if you’re new, and upgrade only when you feel limited by your current tools. The best editor is the one you’ll use consistently.
While learning to edit is fun, we know not everyone has the time to master video editing. That’s where Vidpros comes in. Our team of editors can handle your video editing needs while you focus on creating content. Whether you’re a busy creator, a growing business, or want your videos to look more professional, we’re here to help.
Visit Vidpros to learn more about our video editing services, or book a consultation today!

