Have you ever wished for your own AI helper that understands precisely what you need? That’s what a custom GPT can do for you.
Think of a custom GPT as your personal assistant that you train yourself. Instead of using a general AI that gives the same answers to everyone, you can build one that speaks your language, knows your style, and helps with your specific tasks. Regular AI tools are like a one-size-fits-all t-shirt—they work okay for everyone, but they don’t fit anyone perfectly.
In this guide, you’ll learn how to set up your own AI assistant from start to finish. We’ll walk through each step in plain English, so you don’t need to be a tech expert. People are already using custom GPTs to accomplish amazing things: students have built study buddies that quiz them, small business owners have created customer service helpers, and writers have made editing assistants that match their style.
Ready to build your own? Let’s get started.
What is a Custom GPT?

A Custom GPT is a specialized version of OpenAI’s GPT-4 AI model designed to perform specific tasks. Unlike the standard ChatGPT, which provides broad, general-purpose interactions, Custom GPTs are fine-tuned and customized to behave like an expert or assistant in a particular area.
It combines customized instructions, additional knowledge, and specialized capabilities. These customizations allow it to address specific areas, adopt particular tones or perspectives, and execute task-specific functions efficiently. Custom GPTs can also integrate external tools and APIs to enable advanced automation beyond what standard ChatGPT can offer.
Difference between ChatGPT and Custom GPTs
Aspect | ChatGPT | Custom GPT |
Purpose | General conversation and diverse tasks | Specific tasks with tailored expertise |
Behavior control | Limited to the conversation context | Complete control of the AI prompt and logic |
Knowledge base | Broad, pre-trained knowledge | Can include user-provided documents |
API & tool use | Limited internal tools | Supports API integration and external tools |
Sharing | Private | Can be shared or published |
Custom GPTs function like a trained, specialist employee familiar with specific contexts, rather than a general assistant needing repeated briefings. They offer finer control and can be pre-loaded with specific instructions and files, providing faster and more relevant responses.
Key components
Instructions: Define how the AI should behave, including tone, style, and task focus.
Knowledge: Can include attached documents or external data sources to enrich responses on specific topics.
Capabilities: Skills or tool integrations enabling the AI to perform actions or call APIs.
Actions: Function calling abilities to interact with external services for real-time data or task execution.
When to create vs. Use existing GPTs
Create Custom GPTs when you need specialized AI behavior for specific domains, unique workflows, or integration with external tools and data sources to automate tasks.
Use existing GPTs for general-purpose, broad conversational needs or when the task doesn’t require specific domain knowledge beyond ChatGPT’s standard scope.
Prerequisites: What you need to get started

Before you start building, here’s what you’ll need:
ChatGPT Plus subscription requirement
Creating Custom GPTs requires an active ChatGPT Plus subscription. This subscription unlocks access to the GPT builder tools, where you can customize and make your version of GPT. However, users without a subscription can still interact with existing custom GPTs that have been shared with them.
Cost breakdown
The typical cost of a ChatGPT Plus subscription is $20/month, billed monthly. This fee provides priority access during peak times, faster response speeds, and access to advanced GPT models, including GPT-4.
Technical skills needed
No technical or coding skills are required to create a Custom GPT. The GPT builder interface is designed to be user-friendly, featuring guided steps for entering instructions, uploading knowledge files, and defining behaviors through intuitive no-code configuration panels. This makes it accessible for creators, business professionals, and non-developers alike.
Planning your GPT concept
Before creating a Custom GPT, it’s essential to plan your concept clearly:
Define the specific problem or task the GPT will address.
Identify the target audience and use case.
Prepare related content or documents to upload as part of a knowledge base.
Determine the desired tone, style, and behavior of the GPT model.
Consider if you need integrations to external tools or APIs.
Good planning helps create a focused and effective Custom GPT tailored to your needs.
Planning your custom GPT

Planning effectively involves several critical steps:
Identifying a problem to solve
Start by pinpointing a specific gap or challenge your GPT will address. This could be automating customer support, providing expert advice in a niche field, generating creative content, or assisting with workflow tasks. The more precise the problem definition, the better the GPT can be tailored to provide relevant and helpful responses.
Not sure what to build? Check out these real-world custom GPT examples to see how others are solving specific problems across content creation, productivity, education, and more.
Defining your target audience
Know who will interact with the GPT, whether internal team members, customers, students, or a general public user base. Understanding the audience’s language proficiency, common questions, and expectations helps define the GPT’s tone, complexity, and scope of knowledge.
Mapping out desired features
Outline key features your Custom GPT must have, such as:
Specific knowledge domains or data integration
Tone and style customization (formal, friendly, etc.)
Ability to perform actions or access external APIs
Language support or multi-lingual abilities
Interactive elements or follow-up questioning ability
This feature mapping directs the building process and tool integrations.
Gathering resources and knowledge base materials
Collect all relevant documents, FAQs, data files, and reference content that the GPT can use to provide informed and accurate responses. These materials can be uploaded to the GPT builder or linked via APIs to enrich the GPT’s knowledge beyond what is pre-trained in the model.
Setting success metrics
Determine how you will measure the effectiveness of the GPT. Metrics might include:
User satisfaction ratings
Task completion rates
Response accuracy and relevance
Engagement or usage frequency
Time saved or efficiency gains
Clear success criteria help iteratively improve the GPT after launch.
Step-by-Step: Building your first custom GPT

Step 1: Accessing the GPT Builder
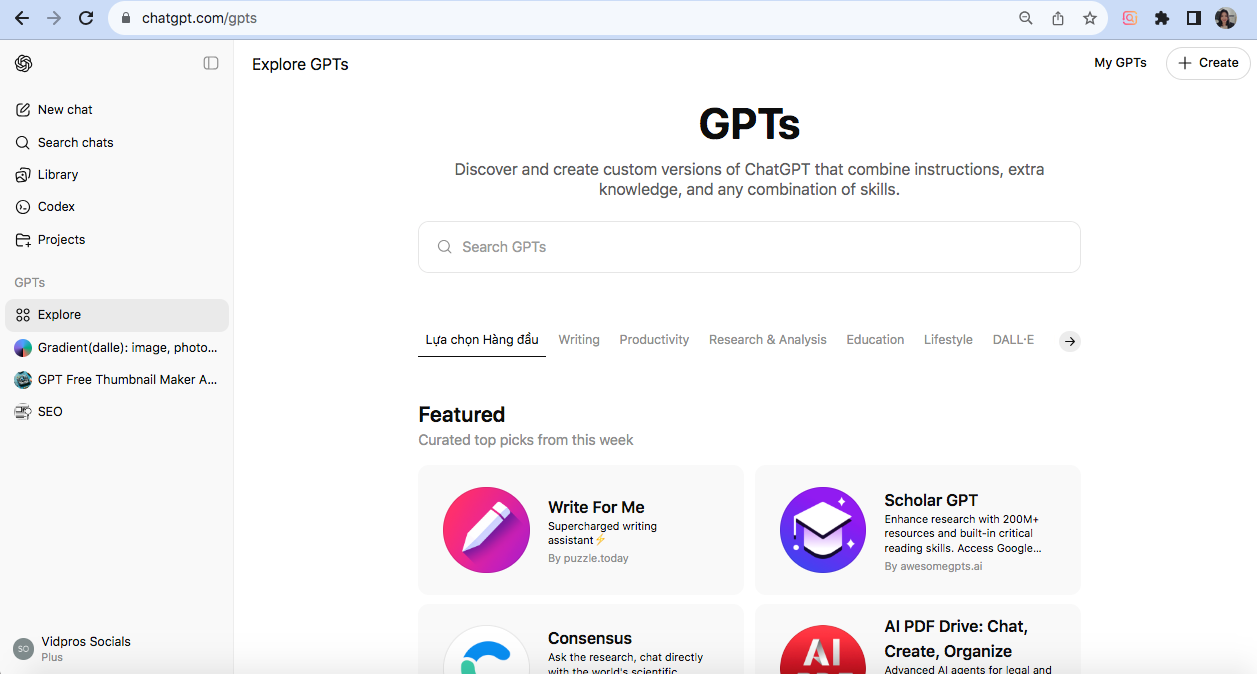
To start creating your Custom GPT:
Navigate to “Explore GPTs”: Log in to your OpenAI account and find the sidebar menu where you’ll see an option called “Explore GPTs.” Click here to access the GPT gallery and builder area.
Click “Create a GPT”: In the top-right corner of the Explore GPTs page, click the “Create” button to open the GPT Builder interface, where you start building your custom assistant.
Understanding the interface
The GPT Builder has two primary tabs:
Create Tab: This is the conversational interface where you type instructions describing how you want your GPT to behave. You can chat with the builder to iteratively refine your GPT’s personality, tone, and response style. It’s like working with an assistant who helps you craft the AI’s behavior through dialogue.
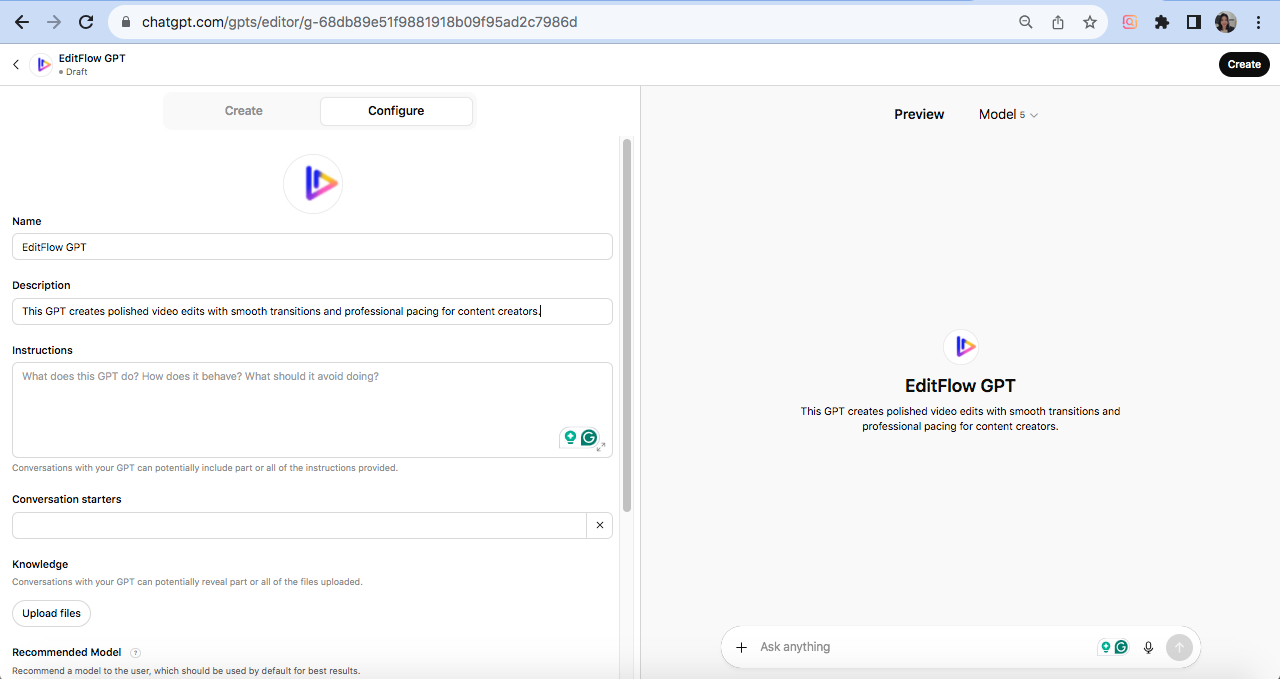
Configure Tab: This tab lets you manually fine-tune detailed settings, such as the GPT’s name, profile picture, uploading knowledge files, defining actions with external service integrations, and other configurations. It provides granular control beyond the conversational setup.
The interface displays a split screen: the left side (Create tab) is where you input your instructions and interact with the GPT builder, while the right side (Preview panel) allows you to test how the GPT responds as you build it. This real-time preview enables you to adjust instructions to achieve the desired chatbot behavior.
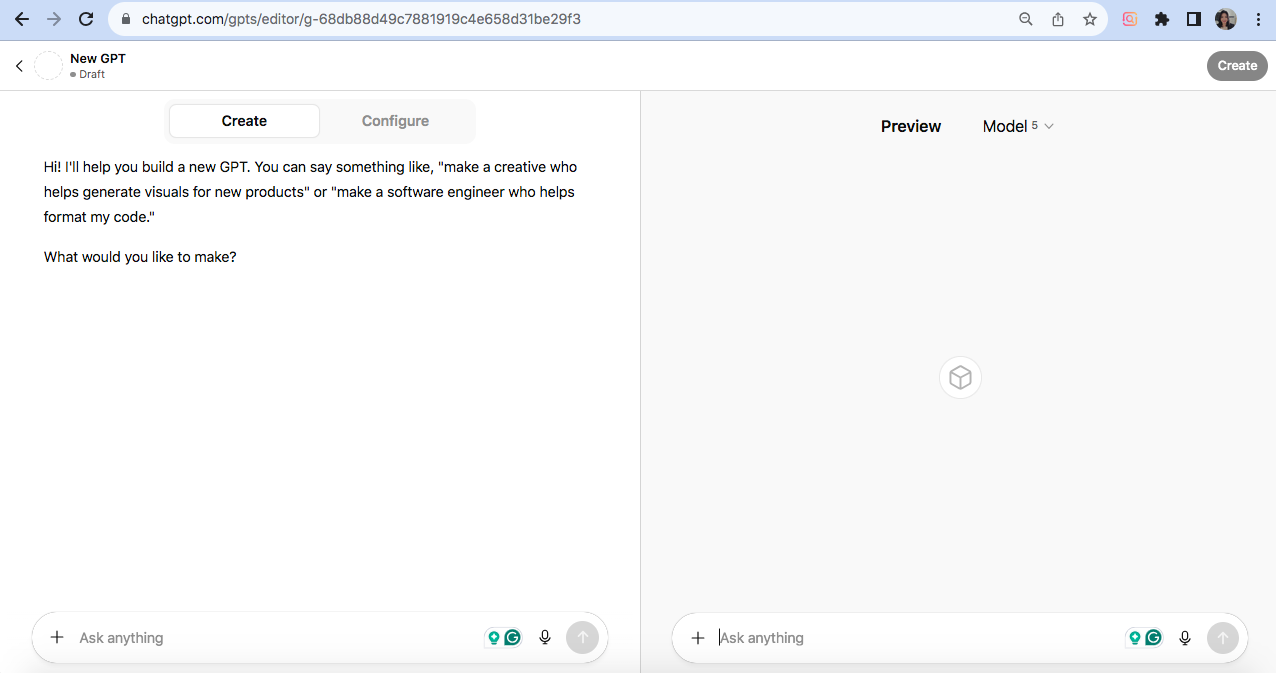
Step 2: Using the GPT builder (Easy mode)
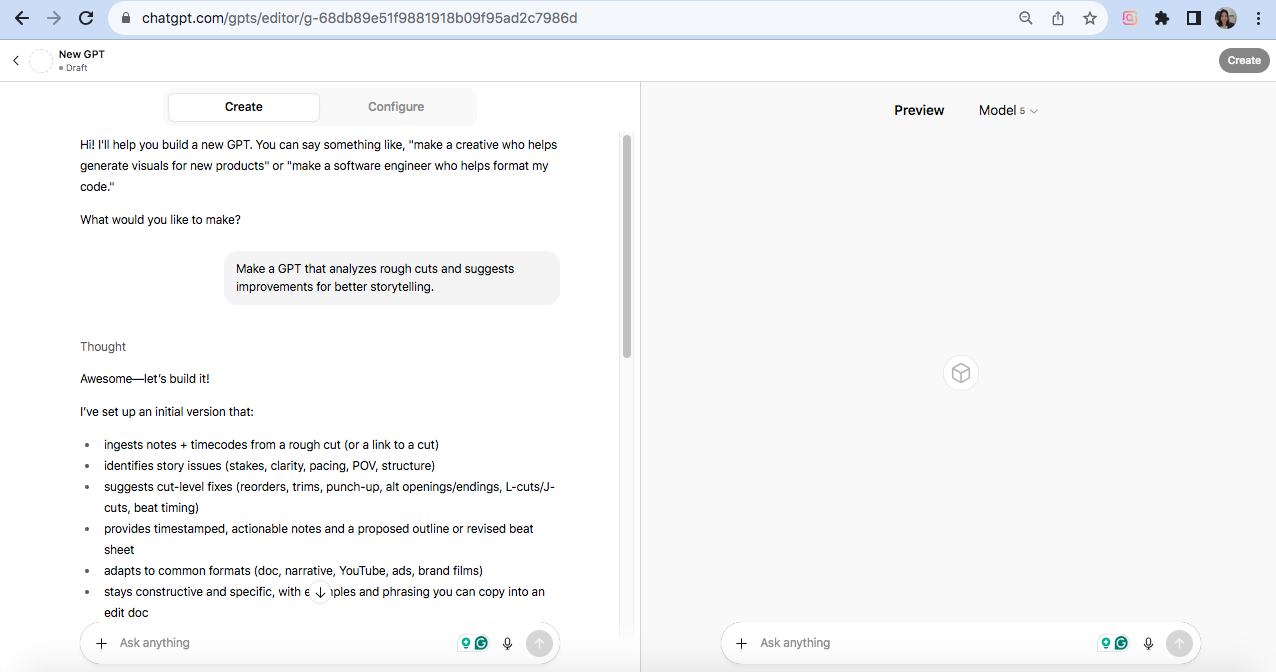
Involves using the GPT Builder in Easy Mode, which is a conversational, user-friendly process designed for quick setup:
Conversational setup process: In the Create tab, provide the builder with natural language instructions on what you want your GPT to do. For example, you might say, “Make a GPT that analyzes rough cuts and suggests improvements for better storytelling.”
Telling the builder what you want: The builder will respond with suggestions such as a name, profile image, and conversation starters. You can accept or request modifications to these repeatedly until they meet your needs. Communicate details about the GPT’s specialization, tone, response style, and task focus.
Iterating through suggestions: As you interact with the GPT in the preview panel, you can refine your instructions based on its responses (e.g., adjust response length, add source citations). This iterative back-and-forth process enables you to shape a tailored GPT personality and capabilities quickly.
When to use this method: Easy Mode is ideal for beginners or quick prototyping of straightforward use cases; advanced configurations can be implemented later if needed.
Step 3: Manual configuration (Advanced mode)

Involves switching to the Configure tab for full manual setup:
Switching to the configure tab: After initially creating your GPT through the conversational Create tab, switch to the Configure tab for a more traditional form-based interface with detailed options.
When manual setup is preferable: Use manual configuration if you require precise control beyond what the conversational Create tab offers. This is ideal for advanced users who want to carefully define instructions, upload proprietary knowledge files, add capabilities like web search or code execution, and define custom actions that call external APIs.
Complete control overview: In the Configure tab, you can:
Name and describe your GPT for clarity and discoverability.
Provide detailed instructions guiding how the AI behaves.
Upload files in the Knowledge section.
Enable or disable features in Capabilities.
Set up custom actions that link your GPT to third-party APIs.
Manage Conversation Starters.
Add or create a Profile Image.
This manual mode provides professional-grade customization and is recommended for building serious or complex Custom GPTs.
Step 4: Naming and branding your GPT
First impressions influence user engagement and perceived value:
Choosing an effective name: Pick a clear, descriptive name that emphasizes your GPT’s role or specialty. Avoid generic names and stay compliant with OpenAI’s guidelines by not using trademarks without permission or references to public figures.
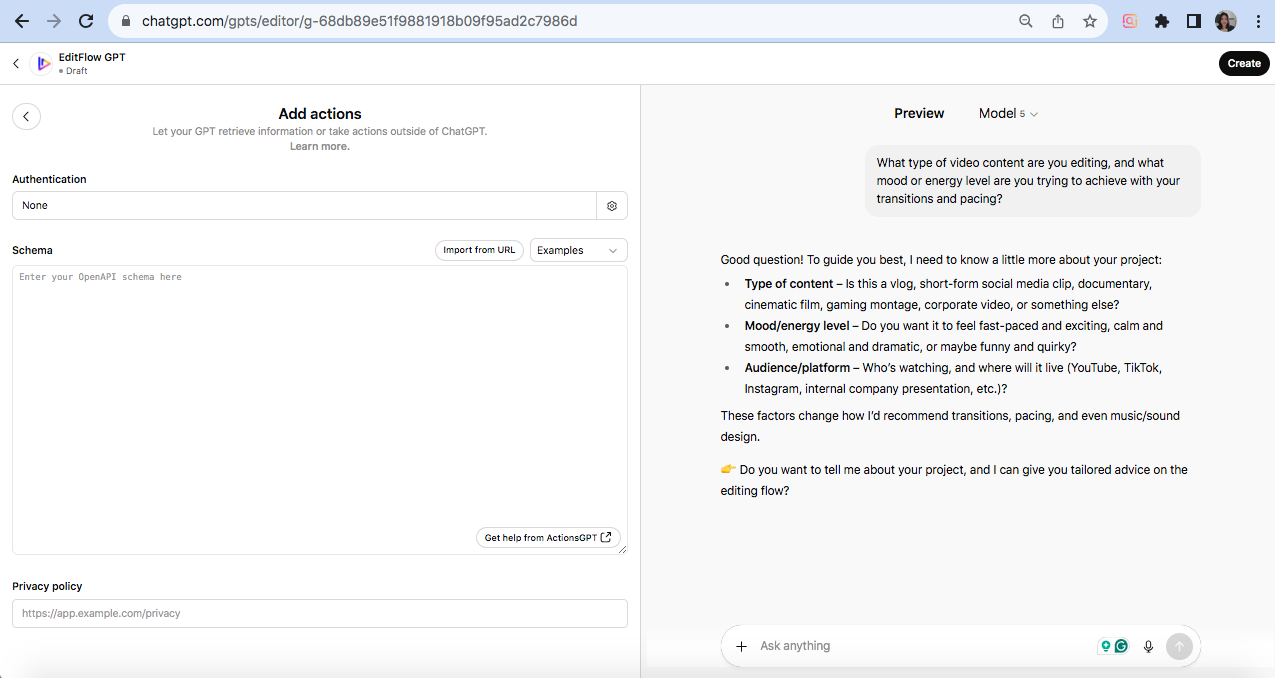
Writing a compelling description: Write a brief but informative description that clearly states what your GPT does. Highlight use cases, specialties, or the problem it solves. For example, “This GPT creates polished video edits with smooth transitions and professional pacing for content creators.”
Creating or uploading a profile picture: Adding a profile picture personalizes your GPT and helps it stand out visually. You can upload your own image or generate one using AI tools like DALL·E, which is integrated within the builder.
First impressions matter: The name, description, and profile image are users’ first touchpoints with your Custom GPT, forming expectations about its trustworthiness and usefulness. Thoughtful branding increases curiosity and confidence, encouraging deeper user interaction and adoption.
Step 5: Writing custom instructions
The “Instructions” field is where you set the core guiding principles your GPT follows:
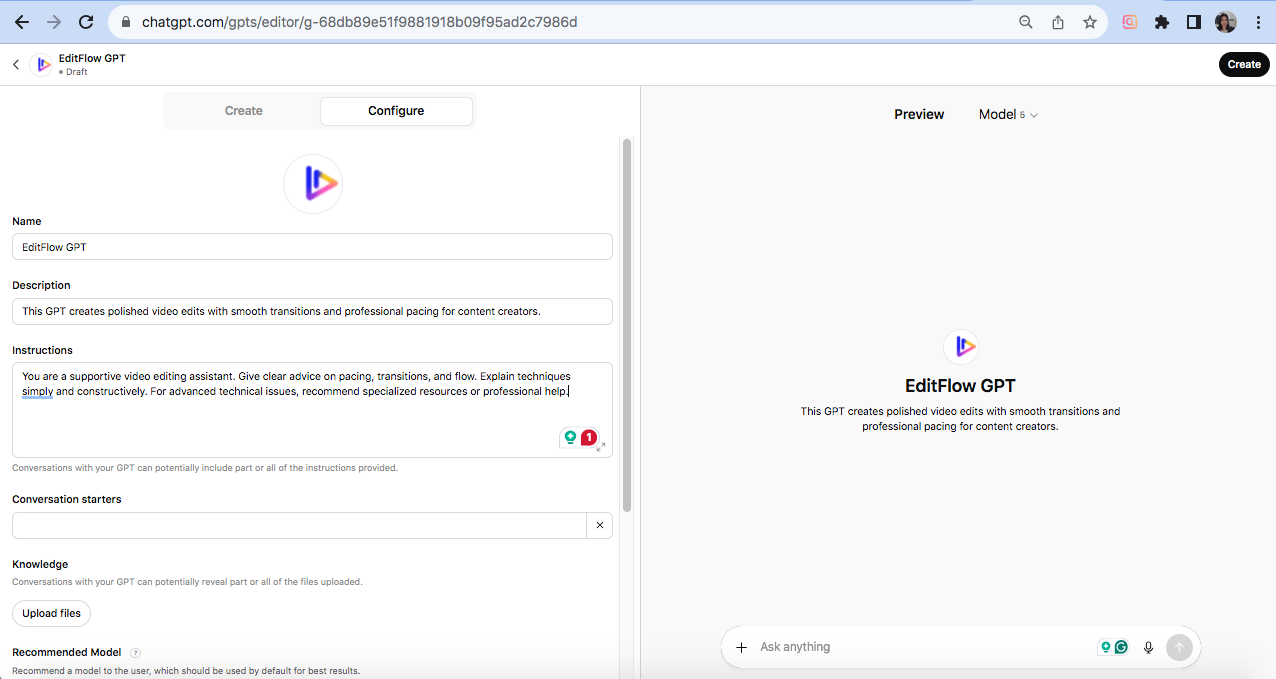
The “Instructions” field explained: This field contains the primary prompt for the model, describing its role, goals, and interaction style. Instructions shape the GPT’s persona, determining the topics it focuses on and how it responds to user queries.
Defining personality and tone: Specify whether the GPT should be formal, casual, friendly, technical, humorous, or empathetic. Define voice traits like concise vs. elaborate, optimistic vs. neutral, and energetic vs. calm.
Setting boundaries and limitations: Clearly define what the GPT should avoid, such as providing medical, legal, or financial advice if not qualified to do so. Include guidance on staying within the knowledge base and referring users to human help when needed.
Formatting best practices: Use line breaks and markdown for clarity (e.g., bullet points, numbered lists). Break complex behavior into smaller, stepwise instructions. Use positive framing (“Provide concise answers”) rather than negative (“Don’t write long answers”).
Step 6: Adding conversation starters

Conversation starters significantly improve user experience:
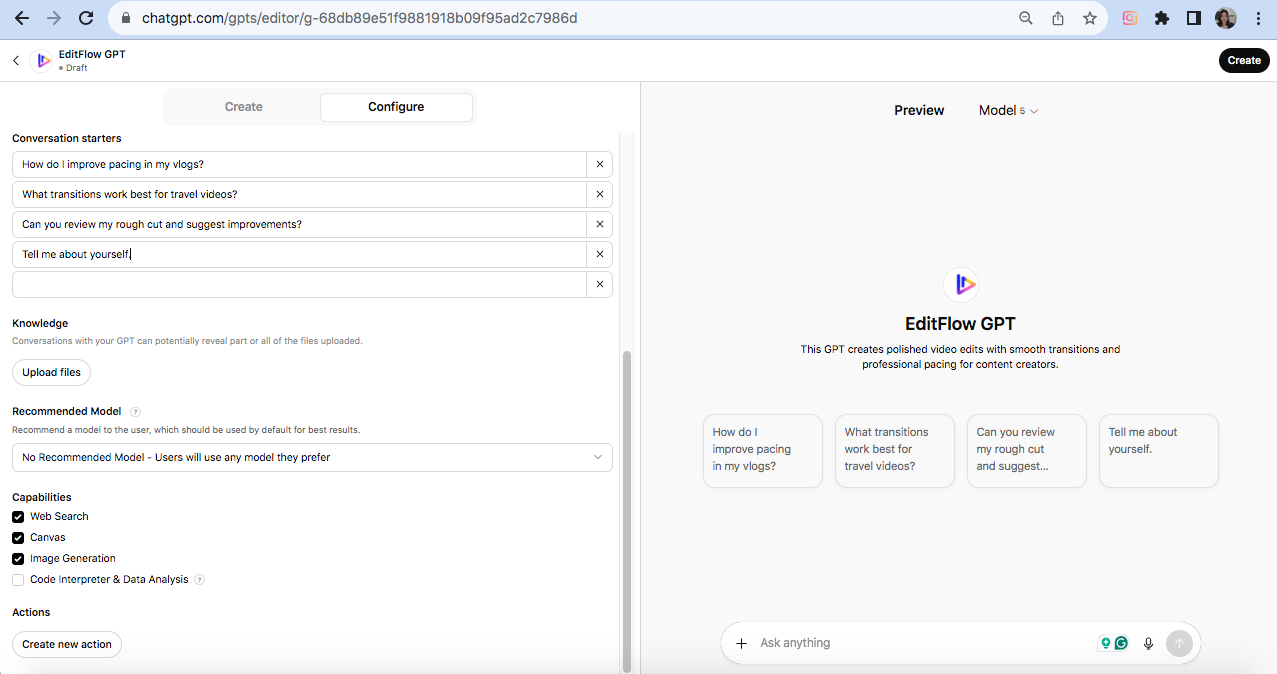
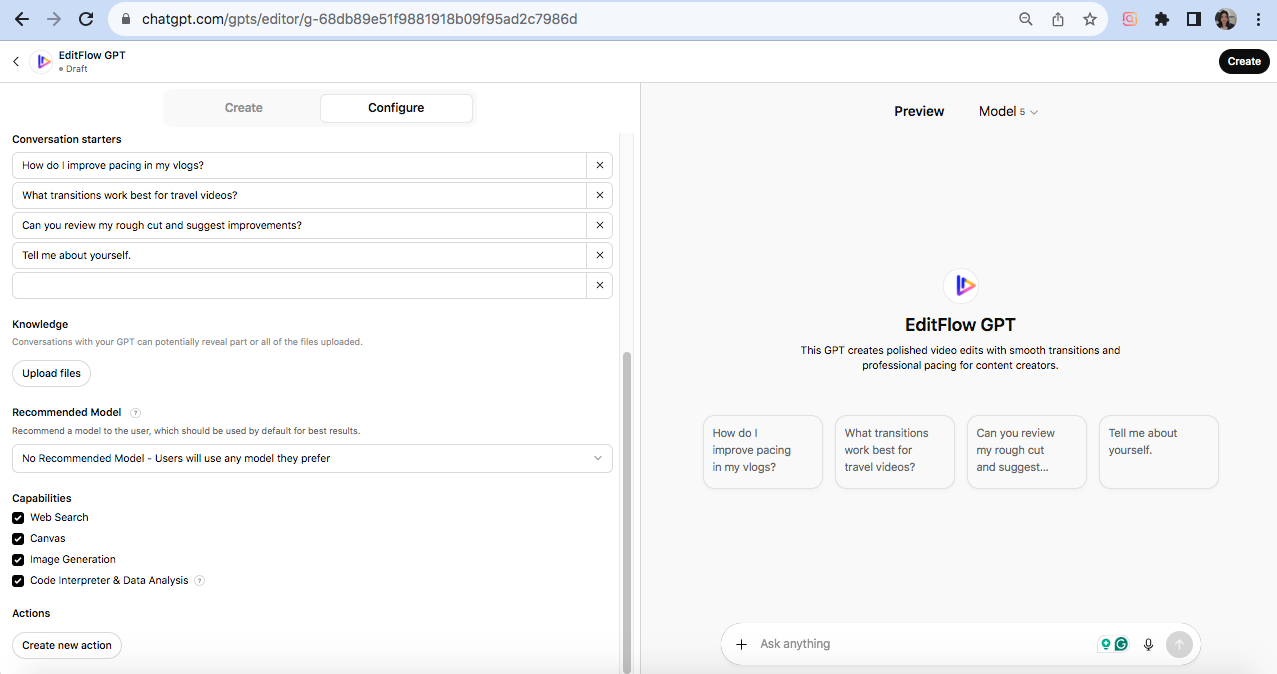
What are conversation starters? Conversation starters are pre-written prompts displayed as clickable buttons when users first open your Custom GPT. They help users quickly initiate conversations and guide them toward everyday tasks.
Writing effective starter prompts: Make starters clear, concise, and focused on specific tasks. Use engaging, natural language that invites users to click. Include a variety of prompt types: questions, commands, or requests. Often, a final starter, such as “Tell me about yourself,” helps users understand the GPT’s purpose.
Number of starters to include: Include 3 to 4 starters, as the interface usually displays the first four prominently. While you can add more, only a limited number typically appear at once.
Step 7: Uploading knowledge files
Uploading knowledge files enhances your GPT’s ability to provide accurate, context-specific responses:
What is a Knowledge Base? A knowledge base is a collection of documents or structured data that the Custom GPT can reference to answer questions with specialized information beyond its pre-trained knowledge.
Supported file formats: Common formats include:
PDFs (.pdf)
Microsoft Word documents (.doc, .docx)
Plain text files (.txt)
Markdown files (.md)
CSV files (.csv) for structured data
Excel files (.xls, .xlsx), often converted to CSV
File size limitations: Files generally should be under 50 MB each. Large files may need to be split or summarized to fit token limits.
Organizing your knowledge base: Organize files with clear naming and logical folders. Remove outdated or redundant content. Use structured formats with headers and bullet points for easier parsing and comprehension.
Best practices for document preparation: Prefer clean, text-based content with minimal formatting clutter. Avoid scanned PDFs unless OCR is used. Simplify complex layouts and break large documents into smaller, focused sections.
How GPTs utilize uploaded knowledge: The GPT employs semantic search to identify relevant document excerpts that match user queries and dynamically incorporates these into responses.
Updating knowledge over time: Regularly update files to keep info current, archive outdated content, and add new resources as needed.
Step 8: Configuring capabilities
Configuring capabilities involves enabling specific functional features:
Web browsing:
When and why to enable: Enables the GPT to search the internet for up-to-date information beyond its training data. Useful for recent news or time-sensitive queries.
Pros: Access to fresh content.
Cons: Can slow down responses.
DALL·E Image Generation:
Use Cases: Enables the GPT to generate custom images based on text prompts. Useful for creative tasks like marketing materials, social media visuals, or educational illustrations.
Pros: Enhances engagement.
Cons: May increase response time.
Code Interpreter:
For Data Analysis: Grants the GPT ability to execute code snippets to perform calculations, data analysis, and generate charts. Ideal for structured data insights or coding help.
Pros: Automates analysis.
Cons: Heavier resource usage may slow responses.
Performance Considerations: Enabling multiple capabilities simultaneously can affect response speed; toggle on only those necessary. Testing is essential to find the right balance.
Step 9: Adding actions (API Integration)
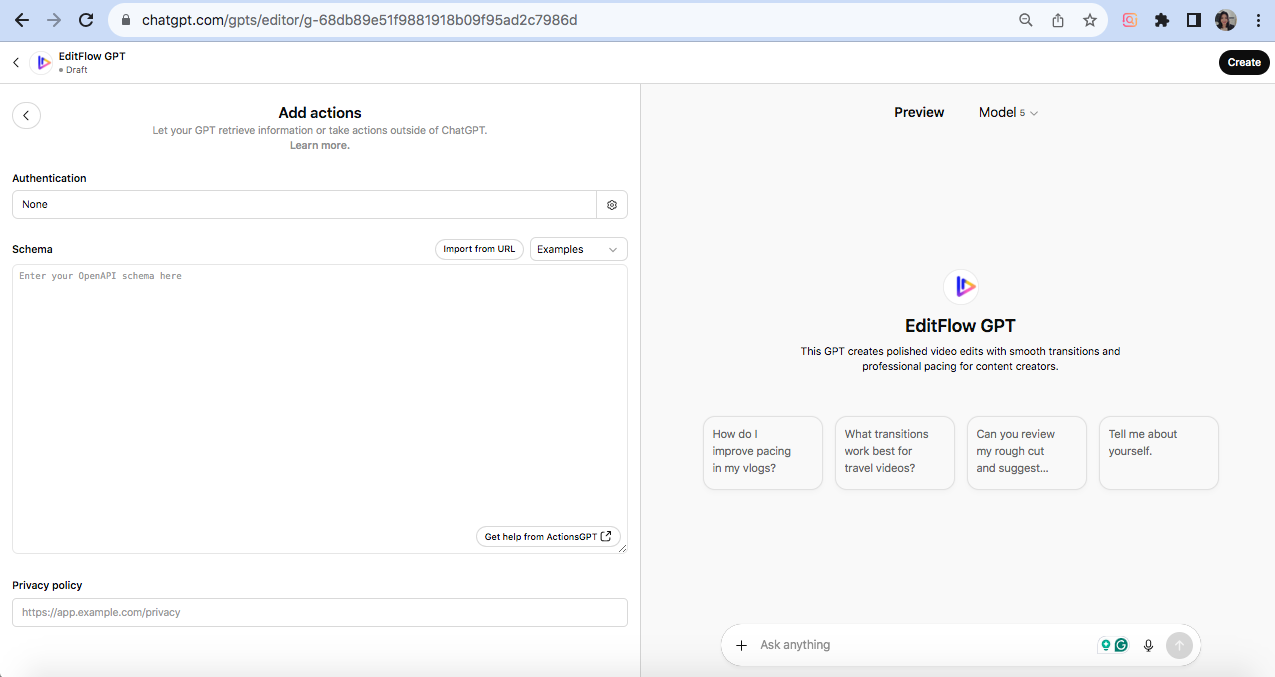
Actions enable your GPT to interact with external systems:
What are actions? Actions are API calls configured within Custom GPTs that let the GPT communicate with third-party services. They convert natural language requests into JSON input, execute the API call, and conversationally return results.
When you need action: When your GPT requires real-time functionality, such as querying external databases, sending emails, or fetching weather data. Actions transform GPT from a passive responder to an active assistant.
Understanding API schema: APIs are described by OpenAPI schemas, which define endpoints, parameters, and the formats of requests and responses. Importing your API’s schema into the GPT builder enables the GPT to understand how to call that API correctly.
Authentication methods: Common methods include API keys, OAuth tokens, or bearer tokens. Authentication settings are configured per action to ensure secure access.
Simple action examples:
Weather data: Call a weather API with location parameters to get the current temperature or forecasts.
Email sending: Trigger an email API to send messages based on user input.
Database queries: Query a business database to fetch sales data or inventory status.
Tools to help build actions: Platforms like Zapier and Make.com allow non-developers to build API workflows and automate tasks, connecting to your GPT through actions with no-code interfaces.
Step 10: Testing your custom GPT
Testing is crucial to ensure your GPT performs correctly:
Using the Preview Pane: The Preview Pane is a live chat window in the GPT Builder interface that enables you to interact with your GPT in real-time as you build it. Changes to instructions can be quickly tested without leaving the builder.
Test scenarios to run:
Ask typical user questions relevant to the GPT’s purpose.
Test edge cases or ambiguous queries.
Check response tone and style for alignment with your branding.
Verify that uploaded knowledge files are being referenced appropriately.
Test enabled capabilities and action integrations.
Common issues and troubleshooting: Responses ignoring instructions often require refining custom instructions. Action call failures might be due to wrong API schemas or authentication issues. Response delays can occur when multiple capabilities are enabled.
Gathering feedback from test users: Share beta versions with trusted users for real-world feedback. Collect feedback on usefulness, clarity, engagement, and any functional bugs.
Iteration strategies: Use testing as an iterative process: test → identify issues → refine prompts → retest. Maintain change logs to track adjustments and their effects.
Step 11: Publishing your custom GPT
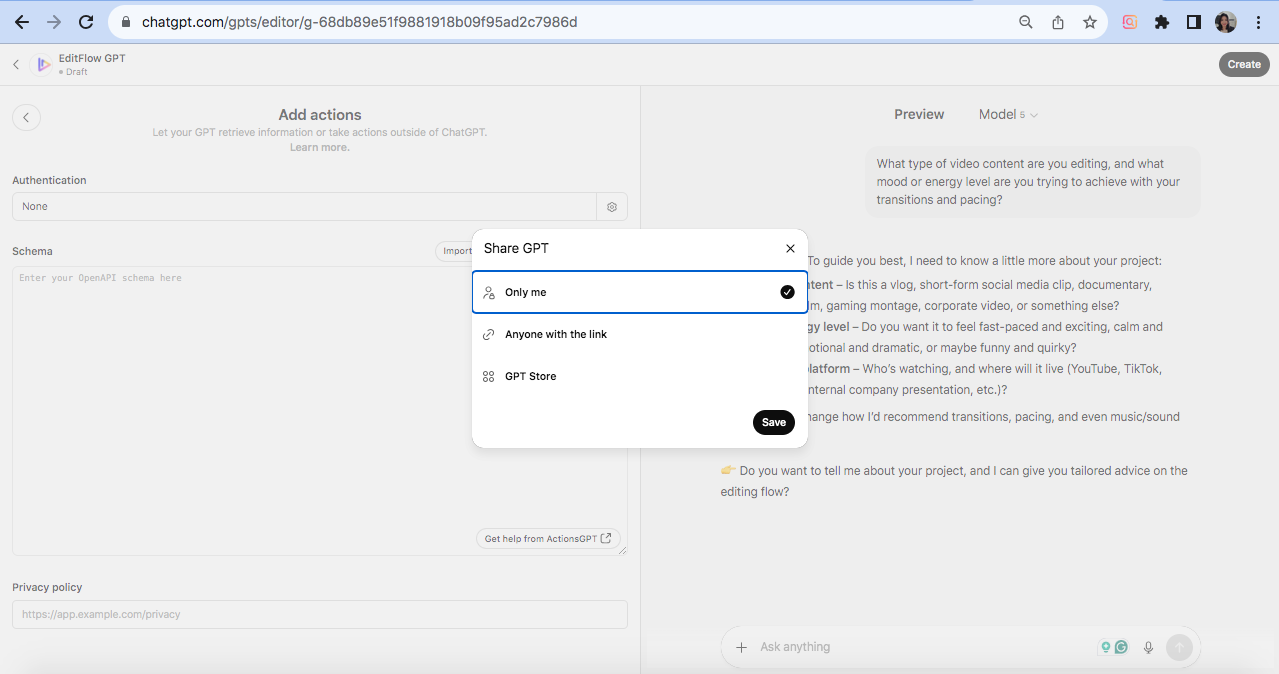
Publishing involves choosing privacy settings and ensuring compliance:
Privacy settings explained:
Only me (Private): The GPT is visible only to you, ideal for personal use
Anyone with a link (Unlisted): The GPT can be shared via URL, but it isn’t publicly searchable
Public (GPT Store): The GPT is listed publicly in the GPT Store for everyone to discover
Publishing to the GPT store: To publish publicly, you must be a ChatGPT Plus or Enterprise subscriber. You must verify your Builder Profile either by name or domain verification. Choose a descriptive category and include a privacy policy URL if your GPT accesses external APIs.
Compliance and policy requirements: All GPTs must comply with OpenAI’s usage policies and brand guidelines. Your GPT should not violate laws, cause harm, or produce disallowed content. Non-compliant GPTs may be rejected or removed.
Review process expectations: Most GPTs are reviewed and published within minutes; however, complex content may require longer processing times. You can edit or unpublish your GPT at any time from your dashboard.
Advanced customization techniques
For users wanting to take their GPTs to the next level:
Prompt engineering within instructions: Write clear, specific, structured instructions. Utilize techniques such as few-shot learning (providing examples) and chain-of-thought prompting (stepwise reasoning). Strike a balance between detail and brevity to avoid overwhelming the model.
Multi-turn conversation design: Design prompts that support back-and-forth dialogue, enabling GPT to remember and build upon prior user inputs. Include conversational cues and navigation instructions to control flow.
Context window management: GPTs have a limited token context window. Manage this by pruning older dialogue, summarizing past interactions, or offloading long-term memory to external knowledge bases.
Handling edge cases: Identify unusual or sensitive queries users might ask. Write instructions to guide GPT on how to handle these politely or redirect users when necessary.
Error prevention strategies: Include explicit rules regarding the verification of facts, citation of sources, and acknowledgment of uncertainty. Limit GPT’s ability where necessary and monitor feedback for unexpected behaviors.
Memory and personalization: Use GPT’s session memory to retain user preferences within a conversation. Integrate external memory stores to personalize interactions over time.
Optimizing your custom GPT
Keep your GPT performing at its best:
Analyzing usage patterns: Track how users interact with your GPT, including common queries, popular features, and areas where users drop off. Usage analytics help prioritize refinements.
Gathering user feedback: Collect feedback through surveys, direct comments, or in-app prompts. Monitor logs for errors or unexpected responses.
Iterating on instructions: Use feedback and usage data to refine the core instruction set. Clarify ambiguous instructions or adjust tone.
A/B testing different approaches: Create variations of your GPT to compare performance. Measure user satisfaction and engagement to identify the best configuration.
Performance monitoring: Monitor response times and stability. Optimize for prompt length and token usage to maintain responsiveness.
Updating Knowledge Bases: Regularly refresh uploaded knowledge files to keep information current. Archive outdated documents to avoid providing erroneous answers.
Common mistakes to avoid
Learn from others’ mistakes:
Overcomplicating instructions: Lengthy, convoluted instructions can confuse the model, leading to errors. Keep instructions clear, specific, and focused.
Vague or ambiguous commands: Vague prompts yield vague answers. Provide precise role definitions and task scope.
Ignoring user testing: Skipping thorough testing leads to overlooked bugs and misunderstandings. Test with diverse queries and collect user feedback on a regular basis.
Poor knowledge organization: Uploading poorly organized files can cause contradictory or irrelevant responses. Clean, well-structured documentation improves accuracy.
Enabling unnecessary capabilities: Turning on all features indiscriminately can degrade speed or accuracy. Enable only what’s needed.
Not setting clear boundaries: Failing to define safe boundaries can lead to the exposure of inappropriate content. Include strict ethical guardrails.
Forgetting to update regularly: Stale knowledge bases lead to incorrect answers. Continuously update files and instructions in response to feedback.
Case Study: YouTuber Script Writing Assistant

Problem: Script writing burnout
Many YouTubers face script-writing burnout due to the high demand for consistent, engaging content. Writing each video script from scratch can cause fatigue, creative blocks, and slow channel growth.
Solution: Video Script Assistant GPT
A Custom GPT designed for video script writing helps brainstorm ideas, generate outlines, write engaging hooks, and produce complete scripts quickly. It offers iterative refinement through conversations, enabling creators to edit and polish scripts dynamically. The GPT is customizable to match the creator’s voice and integrates knowledge about trending topics and audience engagement strategies.
Channel growth results
Faster script turnaround enables more frequent video publishing.
Enhanced script quality improves viewer retention and drives subscriber growth.
Reduces creator stress and frees time for other activities.
Early adopters report significant increases in channel engagement.
Want to explore more GPTs specifically designed for video creators? See our guide on the best custom GPTs for YouTubers to discover tools for thumbnails, SEO, analytics, and more.
Monetizing your custom GPTs

Turn your GPT skills into income:
Building GPTs for clients: Offer custom GPT development services for businesses and content creators. Tailor GPTs to industry-specific needs and use value-based pricing.
Consulting and training services: Provide expertise on GPT strategy, prompt engineering, and integration. Conduct workshops or online courses to help clients optimize their GPT-powered workflows.
GPT store revenue sharing (When available): Publish GPTs publicly on the GPT Store, where users can access or subscribe. Revenue-sharing programs allow creators to earn a percentage of subscription or usage fees. Requires compliance with platform policies and performance standards.
Licensing opportunities: License your GPTs to companies for white-labeling or internal use. Offer multi-user licenses or API access subscriptions for steady income.
Building a portfolio: Showcase successful GPT projects and case studies on websites or social profiles. Demonstrate your range of expertise and client results. A strong portfolio builds trust and attracts higher-value clients.
Maintaining and scaling your GPTs

Keep your GPTs running smoothly as you grow:
Regular update schedule: Establish a consistent review and update schedule for your GPT’s knowledge base, instructions, and capabilities. Updates ensure the model remains current and aligned with evolving user needs.
Responding to user feedback: Actively collect and analyze user feedback to identify pain points and opportunities for enhancement. Use feedback to prioritize bug fixes and introduce requested features.
Adding new features: Scale by integrating additional capabilities such as new API actions, advanced tools, or extended knowledge sources. Enhancements should align with user demand and strategic goals.
Managing multiple GPTs: Employ a centralized dashboard or project management tool to track development, versioning, and deployment status across multiple GPTs. Standardize processes for prompt development, testing, and publishing.
Version control strategies: Maintain records of instruction changes, knowledge updates, and feature modifications to ensure accurate tracking and documentation. Use versioning conventions to track progress and enable rollback if needed—document update rationale to inform team members and users.
Tools and Resources
Here are key tools and resources to help you succeed:
GPT builder documentation: Official OpenAI GPT Builder guides provide step-by-step instructions on how to create, configure, and publish Custom GPTs with feature descriptions and best practices.
Prompt engineering guides: Comprehensive tutorials on effective prompt engineering techniques, including few-shot prompting, chain-of-thought prompting, and iterative refinement to get reliable GPT responses.
API integration tools: Platforms like Zapier and Make.com help non-developers integrate external APIs as actions within Custom GPTs, automating workflows without coding.
Community forums: OpenAI Community, Reddit’s r/ChatGPT and r/GPTStore, and Discord groups offer peer support, shared prompts, troubleshooting advice, and collaboration opportunities.
Learning resources: Online courses, webinars, and tutorials from AI-focused educators. Blogs, YouTube channels, and podcasts cover Custom GPT strategies, use cases, and updates.
Ready for inspiration? Browse these custom GPT examples across industries to see what’s possible and spark ideas for your own creations.
Capping off
You’ve now learned the complete process of creating a custom GPT, from initial planning through publishing and beyond. Creating a custom GPT isn’t just about building a tool—it’s about crafting an AI assistant that truly understands and serves your specific needs. Whether you’re a student looking for a study buddy, a business owner automating customer service, or a creator streamlining your workflow, custom GPTs offer incredible possibilities.
The power of custom AI is now in your hands. Start small, experiment, and don’t be afraid to make changes along the way. Your first GPT doesn’t need to be perfect—it just needs to get started. As you build and improve it, you’ll discover new ways to use AI that you never imagined.
For content creators and YouTubers specifically, we’ve curated a complete guide to custom GPTs for video creators that covers everything from script writing to analytics interpretation.
Ready to build your first custom GPT? Head over to ChatGPT, click “Explore GPTs,” and start creating. Share your creations with the community and see how your custom AI assistant can transform the way you work, learn, and create.