Camera Movements Every Creator Should Know
Ever watch your own footage back and think, “Why does this feel a little flat?” That’s super common. And most of the time, it’s not your camera or your lighting.
It’s that the shot never moves in a way that guides the viewer’s eye.
Simple camera movements add energy, create emphasis, and make your videos feel intentional. Once you know the basics (and when to use each one), your edits get cleaner, and your storytelling gets easier.
And if you’d rather have a team handle pacing, camera moves, and polish for you, our video editing services built for that.
In this post, we’ll break down the core camera movement techniques, when to use them, and clip examples you can study and copy. First, here’s what camera movement really is and why it changes how your shots feel.
What Is Camera Movement and Why Creators Use It
Camera movement is simply the camera moving to guide attention and support the story. That can be a basic pan or tilt, a follow move like a tracking shot, or something more stylized like a dolly zoom.
Here’s the simple way to think about it. Camera motion is like saying “look here” without saying it out loud.
When the camera moves, the viewer’s focus moves with it. The right move can build tension, reveal something off-screen, or land on the exact reaction that sells the moment. Film education resources also describe camera movement as a tool that shapes how the audience experiences a scene, which is exactly why it matters for creators, too.
Quick note before we get into the list. Not every scene needs movement. Sometimes the cleanest choice is a steady, static shot. Movement works best when it supports the moment instead of adding motion just to add motion.
Let’s start with the basics, because these are the moves you’ll use in your next video, even if you’re shooting on a phone.
Basic Camera Movements
These are the foundations. Most creators can do these using a tripod head, a fluid head, or even some handheld shots, if they have good control. The most important thing is to do these smoothly and have a clear focus point.
To keep this easy to follow, each movement below answers two questions: what it is, and when it is useful.
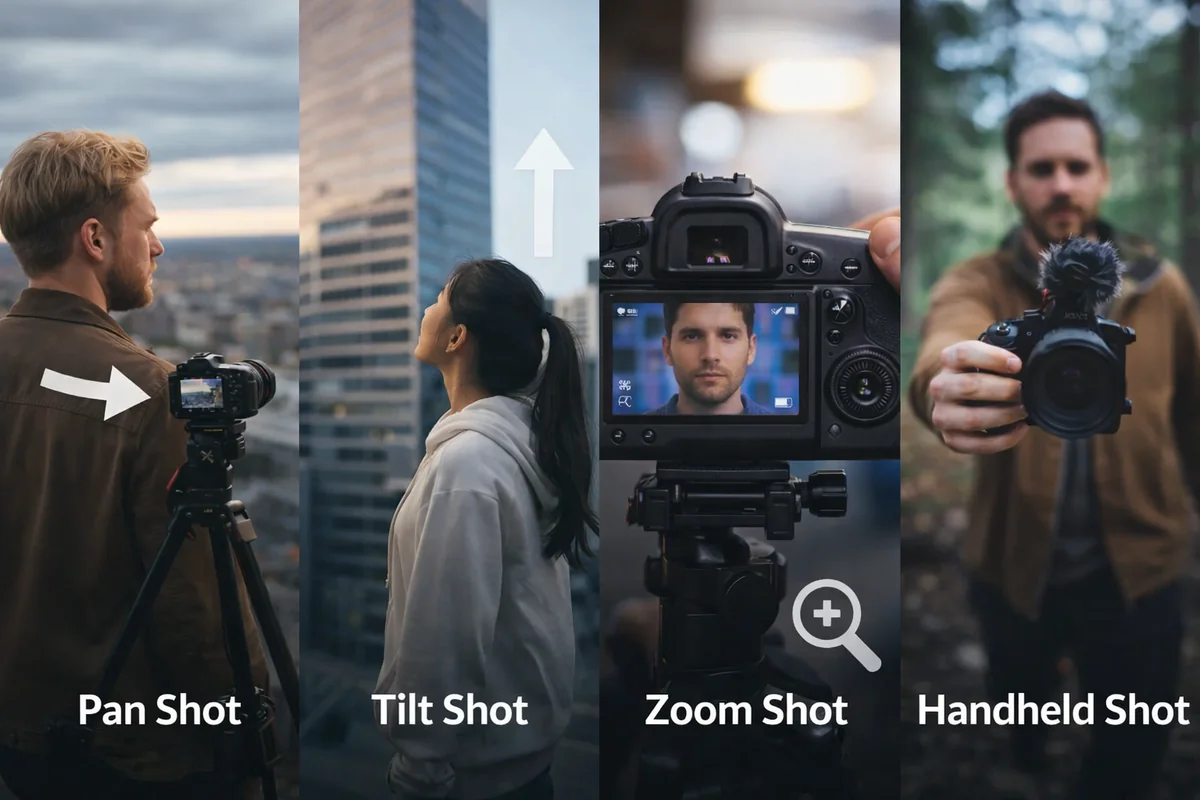
Pan shot (pan camera movement)
A pan camera movement rotates the camera left or right on a horizontal axis while the camera stays in a fixed position. Think of it like turning your head.
When to use it: Use a pan shot when you want to reveal new details or follow a subject’s movement moment, especially when the character’s movement stays roughly in the same area.
A few creator-friendly uses include:
Showing a room or location quickly
Revealing a lineup of products
Following someone walking into the frame
Clip example: search the whip-pan moments from La La Land to see how a fast pan can add energy when it’s motivated.
Zoom shot (zoom lens, focal length)
A zoom shot changes the focal length using the camera lens. The camera stays in a stationary position, but the framing tightens or widens. This is why Zoom feels different than physically moving the camera.
When to use it: Use zoom when you want emphasis without changing the camera’s position, or when you want a documentary vibe. A quick zoom can also be used for a punchy moment, like a reaction or reveal.
Tip from experience: zoom is strong flavor. If you use it on every shot, it stops feeling special.
Handheld shots
Handheld shots involve holding the camera without a stabilizing rig. They can feel raw, immediate, and human.
When to use it: Use handheld when you want realism and energy, like TikTok street interviews, behind the scenes, or action sequences where perfection is not the goal.
A practical trick that helps: keep elbows tucked, and move your whole body like you’re carrying a full cup of coffee. It calms the shake without killing the vibe.
Once you’re comfortable with these basics, you’ll start combining movement with lens and focus choices. That’s where “techniques” come in.
Camera Techniques
Camera techniques are still part of camera movement, but they usually combine motion with lens changes or focus control to create a specific effect. The camera operator’s job gets a little more demanding here because timing matters.
Before the breakdown, a quick lead-in: techniques are powerful because they change what the audience feels, not just what they see.
Dolly zoom (lens focal length plus movement)
A dolly zoom happens when you physically move the camera while changing the lens focal length in the opposite direction. The subject stays similar in size, but the background stretches or compresses.
When to use it: Use dolly zoom to heighten tension, create dramatic tension, or suggest a supernatural force or sudden realization. It’s a great “something just changed” tool.
Clip example: look up a “Vertigo effect” compilation. You’ll recognize it instantly.
Dolly shot (dolly movement, dolly tracks)
A dolly shot is created by placing the camera on a dolly and moving it, often on dolly tracks. This is classic Dolly movement, and it’s known for smooth, deliberate motion.
When to use it: Use a dolly shot for smooth push-ins and pull-outs, especially in moments with emotional impact. It’s also great for product shots where you want premium movement.
No dolly? You can mimic the look with a gimbal or a careful handheld push, but the smoothness is the whole point.
Truck shot
A truck shot is lateral movement, where the camera moves horizontally left or right, usually staying oriented toward the subject. The key difference from a pan is that the entire camera moves, creating parallax.

When to use it: Use truck shots when the scene benefits from depth, like moving past foreground objects or following one character in a hallway.
Arc shot (orbit)
An arc shot circles around a subject. It often moves around a central axis, keeping the subject near the center while the background rotates.
When to use it: Use arc shots to build energy, show power dynamics, or make a moment feel heightened. It’s great for hero shots, product beauty shots, or a turning point.
Clip example: look up arc shots in The Dark Knight. You’ll see how the movement can amplify tension.
Pedestal shot (entire camera ascends)
A pedestal shot is when the entire camera ascends or descends vertically while staying level. This is different from a tilt, which rotates.
When to use it: Use a pedestal shot when you need to reframe a tall or high subject smoothly, or when you want to reveal something by rising, like a sign, a skyline, or a subject standing up.
All these moves look better when the viewer understands the space first. That’s where establishing shots come in.
Establishing Shots
Establishing shots set the context. They tell the audience where we are and what the scene is about before we go tighter.
A quick lead-in: establishing shots are not just “film stuff.” They make creator content clearer, especially when you’re showing locations, events, or processes.
Wide shot and static shot
A wide shot shows the space. A static shot is one where the camera stays in a stationary position. Static scenes can feel confident and clean, especially for tutorials, interviews, and explainers.
When to stay static: Stay static when clarity matters more than energy. If your message is the point, keep the frame steady and let your words do the work.
Now that you’ve got the moves and the context, the real skill is using camera moves for storytelling, not just motion.
Camera Moves for Storytelling
This is the part that makes everything click.
Types of camera shots and camera techniques are tools, but the intention is what makes them work. If a movement doesn’t support the moment, it usually feels like filler.
Here’s the framework we use when planning shots:
Use camera movements to do one of these:
Reveal: show new details or shift the viewer’s perspective
Follow: stay with the subject moment
Emphasize: make a moment land harder emotionally
Build tension: create anticipation, unease, or dramatic tension
If you want some quick pairing ideas, here are a few that work constantly:
Common creator scenarios:
Talking head emphasis: a slow push-in or subtle dolly shot to capture facial expressions
Product b-roll: arc shot plus a controlled dolly movement
Real estate walkthrough: tracking shot with occasional pedestal shot for reveals
Tutorials: mostly static shot, then pan camera movement or camera tilt only when you need to show a step
Action sequences: handheld shots or tracking shots to keep momentum
Camera Moves for Creating Suspense
Suspense comes from restraint and timing. Camera movement helps because it can pull attention, delay information, and heighten tension before the reveal.
Here are moves that reliably create suspense:
Suspense-friendly camera moves:
Slow push-in: makes the moment feel heavier and more intense
Arc shot: adds unease and builds dramatic tension
Handheld shots: adds realism and urgency
Whip pan or quick zoom: adds a jolt, especially as a transition into a reveal
The best suspense tip I can give you is simple: do fewer moves, but commit to them. A calm, controlled move often creates more tension than frantic motion.
Let a Dedicated Editor Polish Your Camera Movements
Once you start using camera movement on purpose, your footage gets easier to edit and your videos feel more “alive” right away.
But if you’re filming regularly and the edit is what slows everything down, that’s where having a steady process helps.
At Vidpros, you can hand off the pacing, clean cuts, and polish to a dedicated editor through our time-based video editing subscription. You keep shooting and publishing. Your videos stay consistent.
And even if you still edit some videos yourself, choosing the right movements on set makes your whole timeline faster to finish. Watch our demo and get started with our trial offer!