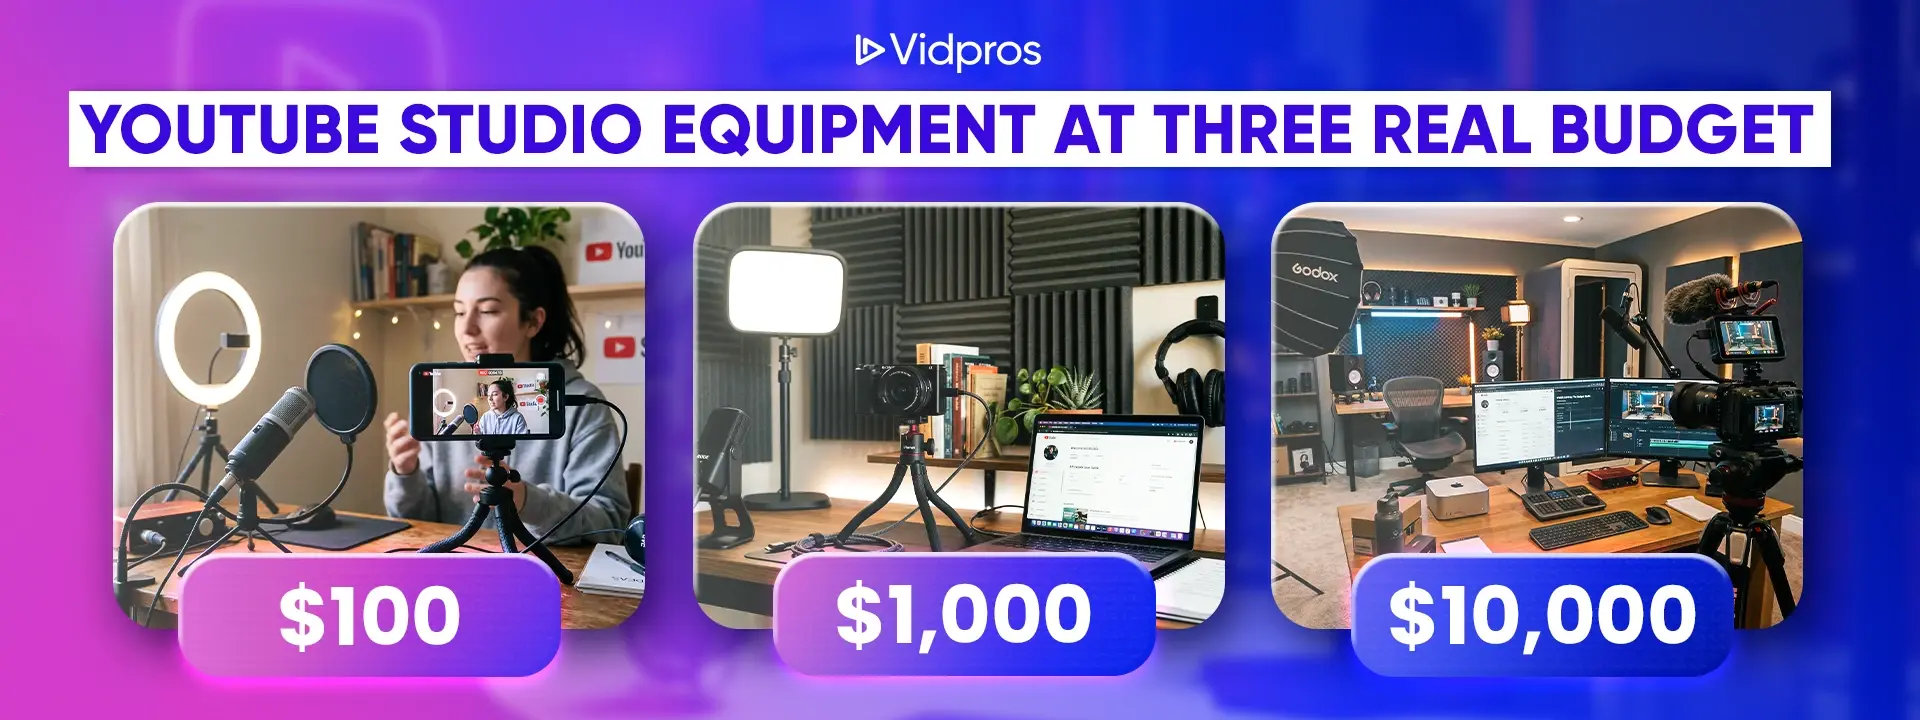
YouTube Studio Equipment for every budget $100-$10k
Starting a YouTube channel used to be simple. A phone. A (vague) idea. Start recording. The end. But today it feels like you need a mini Hollywood studio. Search “YouTube gear,” and suddenly everyone is telling you to buy cameras, lights, mics, monitors, and software before you even upload your first video. But that’s what it takes to become a good YouTuber and to make millions (or billions like some of them do).
Over 20 million videos are uploaded to YouTube daily, and…ironically, many big creators started with almost nothing.
So instead of giving you another “buy this gear” list, this article breaks down what actually matters in YouTube Studio equipment at three real budget levels:
$100
$1,000
$10,000
The $100 setup: AKA starting cheap
Most people think that means they can’t build a home studio. That’s not true.
In fact, many early YouTube videos that went viral were recorded with almost no gear.
Camera for a cheap setup
Most modern smartphones have a good camera for starting a YouTube channel.
You already have:
4K recording
image stabilization
decent sensors
automatic exposure
Most cameras used by beginner (emphasis on this word) creators aren’t dramatically better.
So instead of buying a high-quality camera, keep the phone and spend money elsewhere. Because, the biggest limitation isn’t the camera body, but it’s the lighting.
Of course an important part of good camera quality is also the stability of the video, which is where a sturdy tripods come up.
Don’t overlook it if you’re on the move or vlogging outside because even a $20 tripod stand can stabilize your good camera or smartphone.
Many beginner YouTube studio setups look far better simply because the sturdy tripod keeps the framing consistent.
A good option for your phone is the SENSYNE 62″ Phone Tripod, which costs around $16, and it can also be used as a selfie stick.
Source: Amazon
Lighting for a cheap setup
If there’s one thing beginners used to underestimate when creating their YouTube videos, it was the lighting.
According to industry studies, videos with proper lighting receive higher engagement than poorly lit videos because viewers judge stream quality within the first few seconds.
Fortunately, even cheap ring lights can dramatically improve a YouTube studio setup.
A typical beginner lighting setup might include:
1 ring lights
natural window lighting
a cheap reflector (or none if you don’t care about that at this stage)
If you want to go slightly better, you can also add LED panels, use a small fill light, or even place the lights at a 45° angle – even though these are considered an upgrade (see the $1000 setup).
One of the cheapest options is the NEEWER Basic 5″ Ring Light which costs around $18.
Photo and price source: Amazon
Audio for a cheap setup
A good microphone should always be part of your YouTube Studio equipment because people are using them even for simple/shorter video content on other platforms…just for fun.
Popular budget options include:
MAYBESTA Wireless Mini Microphone
Lavalier mic, etc.
Most of the simplest mics come with:
a pop filter
a shock mount
MAYBESTA Wireless Mini Microphone for iPhone, Android Phone which costs around $19. Source: Amazon
These small pieces of equipment reduce background noise and vibration and are great for vloggers because you just clip them on and the audio quality is crisp.
If you plan on recording vocals (which is common with vlogging…?), this is even more important.
See also: Budget-Friendly Video Creation: $100 YouTube Studio Setup for Cellphone Vloggers
The $1000 setup: Where things start getting serious
Once a youtube channel begins growing, creators usually upgrade their YouTube Studio equipment.
This is where the professional home studio begins (it’s only the beginning because there’s also the $10K equipment setup) to form. But again, many creators upgrade the wrong things.
Camera upgrade
At this stage, upgrading from a phone to a good camera can really help because they have better sensors, or interchangeable camera gear, or improved autofocus, or overall higher video quality, for that matter.
Many creators specifically look for a flip screen because it helps when recording yourself (you can see framing and focus), so maybe that’s something you should be looking into.
This matters for talking-head YouTube videos especially!
So, keep these things in mind. You need a:
mirrorless camera body
flip screen
clean HDMI output
Popular choices include:
Sony ZV-1, which costs around $511
Photo source: Amazon
Another option is also the Canon EOS Rebel which costs around $529.
Photo and price source: Amazon
Lighting setup
At a $1000 YouTube studio equipment setup, the lighting MUST improve and you should move from random ring lights to a proper lighting setup.
This usually means three-point lighting.
The formula goes like this:
key lighting (LED panels)
fill light
background lighting
adjustable stands
This is important because with a more advanced lighting setup, creators can control shadows, skin tones, background separation, etc. Some (more) professional creators can also adjust color temperature.
A good choice is the GODOX QR-P90, which costs around $148.
Photo and price source: Amazon
There’s also the NEEWER 47″/120cm Parabolic Softbox which costs around $118.
Photo and price source: Amazon
Audio Setup
If your YouTube content involves speaking, upgrading the microphone should be a matter of interest.
This is usually where many creators switch to:
XLR microphone
shotgun mic
professional mic interface
professional sound quality and control
cleaner voice recording
You must understand that the real difference isn’t just “different microphones.” It’s the entire signal chain and recording control. While for the $100 setup you had limited control over audio levels, limited ability to upgrade parts or even weaker handling of room sound, in this case you have none of those issues. But of course, the result is better quality, not full studio-level (yet).
The $1,000 setup mostly benefits:
podcasts
interviews
professional YouTube studio productions
creators who want a professional home studio
A good mic choice is the Shure MV7X XLR Dynamic Microphone, which costs around $200 and is a must have.
Photo and price source: Amazon
See also: The FULL $1000 YouTube Studio Setup for Quality Content
The $10,000 YouTube studio equipment setup: What the professionals use
At the high end, YouTube Studio equipment becomes a full production pipeline as the more experienced YouTubers have shown us.
From cinema cameras to multi-camera recording to advanced lighting setups to dedicated editing workstations.
Most youtube creators never actually need this level, because it only makes sense when:
Your YouTube channel is a business.
You upload videos frequently.
You want cinematic video quality.
But if you want to go to that stage, you must know what the professionals are using.
Multiple cameras
High-end setups often use multiple camera body units, because some need different video angles for dynamic storytelling and better editing options.
A typical YouTube studio at this level includes:
2-3 good camera units
different, interchangeable lenses
professional camera gear
A good choice is the Sony Alpha 7 IV, which is a full-frame mirrorless camera WITH interchangeable lenses. It costs around $1,983 on Amazon.
Photo and price source: Amazon
Another option is the Canon EOS 5D Mark IV, which costs around $2,801. This is a full-frame (30 Megapixels) SLR camera with a 61-point AF system.
Photo and price source: Amazon
Lighting setup
High-end YouTube studio setups often include full studio lighting rigs.
With typical systems including:
large led panels
RGB accent lighting
adjustable softboxes
background lighting
For example, a good choice for high-end video creation is the Aputure Amaran F22x RGB, which costs around $699.
Photo and price source: Amazon
Most creators place the light slightly above eye level and about 45 degrees to the side. A soft LED light or softbox works well because it spreads the lighting evenly and avoids harsh shadows.
NEEWER 700W Equivalent Softbox Lighting Kit is another great choice. Softbox diffuses the light for perfect even lighting when you need it for the best shots possible.
Photo and price source: Amazon
Sound production (broadcast-level audio)
At this level, audio becomes extremely polished as professional setups use:
studio microphone
audio interface
mixing console
This allows perfect, crips voice, extremely clean sound and zero background noise
This is the type of high-quality audio you hear in podcasts or documentaries.
A good choice is the Shure SM7B Vocal Dynamic Microphone, which costs around $439.
Photo and price source: Amazon
These YouTubers use also great audio interfaces. Think RodeCaster Pro II or Vocaster Two, which bring everything together in one unit with a polished finish that not all creators focus on with multiple-piece equipment.
And another high-quality microphone option is the Shure SM4, which is an XLR condenser mic for your home studio. It, of course, includes a detachable pop filter and shock mount. It costs $299 on Amazon
Photo and price source: Amazon
Capping off
The smartest way to build YouTube Studio equipment is simple – Upgrade when something really becomes a bottleneck. But at first you need to start small and grow from there.
So the real priority list should look like this:
Lighting
Audio
Editing software
Camera
Advanced gear
Not the other way around.
And while the other stuff are all gears, editing is something where some YouTubers get stuck and for good reason. A single video can take hours of cutting, color grading, audio cleanup, transitions, exporting etc.
So, if you don’t want to spend all your time in editing software, there’s an easier option.
You can try Vidpros.
We are currently offering a $100 trial where you can get:
10 short-form videos edited
or1 long-form video (it’s your choice)
All done by professional video editors. You can watch the demo here and decide if it’s a good fit for you (it really is).
If you’re already investing in YouTube Studio equipment, outsourcing your video editor might actually save you more time than buying more gear.
The $100 YouTube Home Studio Setup: Smartphone Power
Ready to start filming YouTube videos and launch your YouTube career? Your next studio is hiding in your pocket. Today’s smartphones, like the Google Pixel 7a, shoot stunning 8K video—rivaling movie cameras. But to truly shine, you need a few budget-friendly accessories.
Pair your phone with a Velbon tripod (under $50) for smooth shots and a Neewer ring light kit (under $150) for that pro glow. Don’t skimp on audio—a $20 BOYA BY-M1 lavalier mic trumps your phone’s built-in one every time.
For editing, free apps like iMovie or YouCut pack a punch without costing a dime. All in, you’re under $100.
The secret? It’s mastering the basics: lighting, framing, and audio settings.
But don’t just take my word for it.
In my quest for budget-friendly YouTube studios, I contacted Kat Sua, Vidpros YouTube Content Creator. Her setup perfectly exemplifies building a professional studio over time without breaking the bank.
Kat’s journey shows you can start small and upgrade as you grow.
She began with essentials that matched her content: a ROG Zephyrus G14 laptop ($1,499) for work and streaming, a Blue Yeti Pro mic ($89.99) for voice-overs, and a Logitech C922 webcam ($44.39) for on-camera work. She also uses a Glorious Model O Wireless mouse ($79.99), a RAZER Barracuda X headset ($99), and a mix of lights – a desk ring light, a more considerable ring light, and LED strips (about $43 total).
Her biggest challenge? Balancing cost with content needs.
“You might overspend on gear you don’t fully use,” Kat warns.
Her solution? Focus on one content type first, then grow. She started with writing and voice-overs, so her laptop and mic were priorities.
Kat emphasizes that content creation isn’t just about gear.
“You may not have the best-looking setup, but consistent content builds community,” she says. She also advises playing to your strengths and passions. “Some channels recap movies with just voice-overs. Find your niche.”
Her message: start with what you have and upgrade strategically.
“Check popular creators’ first videos,” Kat suggests. “They started somewhere too. It’s your journey, not an exact blueprint.”
These insights are from a creator who’s been there. Her setup proves that with intelligent choices and creativity, a professional YouTube studio is within reach, even on a tight budget.
The $1,000 YouTube Studio Setup: Semi-Pro Quality and Video Editing Software
Ready to level up your YouTube game without breaking the bank?
With around $1,000, you can achieve semi-pro quality that will wow your viewers.
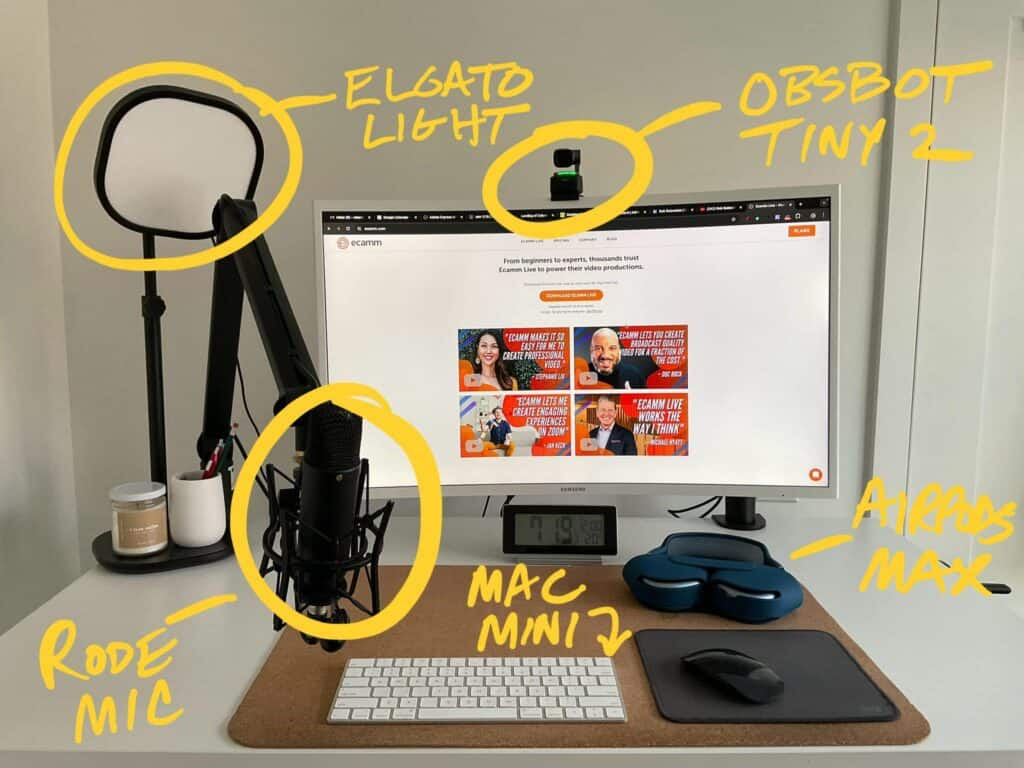
Start with the Sony ZV-1, a Vlogger’s dream camera with crisp 4K and killer autofocus. Pair it with the Elgato Key Light Air for that pro studio glow, which is controllable from your phone and an essential part of your lighting setup.
Don’t cut back on audio—the Rode VideoMic Pro+ delivers broadcast-level sound. Mount it on a Manfrotto Compact Action tripod for cinematic smoothness. Set the scene with a muslin backdrop and shape your light with reflectors and diffusers.
The secret sauce? Mastering fundamentals: lighting, framing, audio, and purposeful editing. Nail these, and your content will scream professionalism.
Speaking of professionals, here’s a compelling real-world example.
While writing this article, I stumbled upon a Facebook post by Rob Balasabas, a Vidpros client and Head of Creators Partnerships at Uscreen.
His home studio setup? It fits perfectly in our “$1,000 and above” category.
This tech CEO’s choice validates our recommendations, proving these setups aren’t just for YouTubers but for industry leaders who value top-notch video production. It’s clear: quality gear is a groundbreaker across the board.
The $10,000 YouTube Studio Setup: Pro-Level Production
Want to take your YouTube channel to the next level? With $10,000, we’re redefining your studio.
Picture a Sony A7 IV or Canon EOS R5 capturing a mind-blowing 8K, paired with prime lenses for that Hollywood pop. Light your scenes with high-end LEDs like the Spectrum Aurora, adding softboxes and barn doors for cinematic perfection.
Audio-wise, think broadcast quality: a Blue Yeti USB mic or pro-grade lavaliers and shotguns. Support it all with sturdy tripods, focus-assist monitors, and teleprompters. Set the scene with modular sets and green screens, then edit in Adobe Premiere Pro. Use soft light from powerful sources to create a pleasing visual effect.
For live streaming? The Elgato Stream Deck is your command center.
It isn’t just an upgrade; it’s a statement to captivate, not entertain.
Speaking of captivating, let’s pivot to an inspiring example.
In my research, I found a video by Desiree Martinez, a Vidpros client. She started with a Logitech camera, Blue Yeti mic, and ring light. She smartly added a standing desk, teleprompter, and XLR mic as she grew for live streaming on Stream Yard, a multi-arm stand.
Desiree’s evolution proves you can build a pro-level studio for just $1,000. Start small, upgrade smart, and choose tools that amplify your content.
Her setup proves that in the YouTube arena, creativity often trumps cash. So whether you’re spending $100 or $10,000, remember how you use it to make your channel shine.
Comparing the Setups
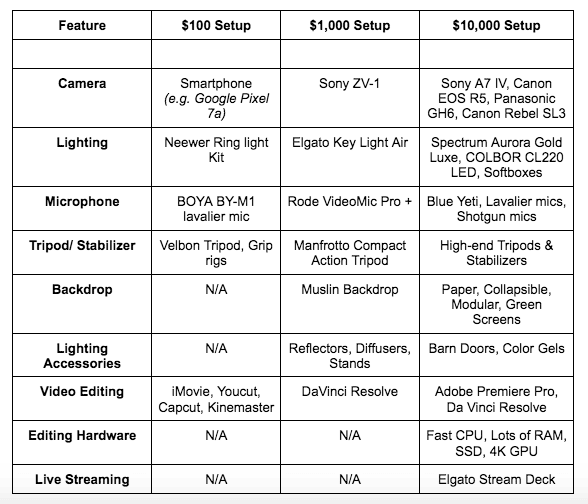
The table highlights how the setups scale from using just a smartphone and essential accessories at $100 to incorporating pro-grade gear like the Sony ZV-1 and Elgato lights at $1,000, all the way up to the $10,000 setup with top-tier cameras, advanced lighting, high-end audio, supporting equipment, and pro editing tools.
$100 Setup—This is affordable, but the video quality is decent at best. A video of poor quality won’t engage the audience very much. Enhancing the content requires creativity and editing skills.
$1,000 Setup—Pro-grade gear like the Sony ZV-1 means significantly better video/audio quality. That higher production value will engage the audience. However, intense creativity and skills are still needed.
$10,000 – Setup for breathtaking quality cinema-level cameras, lighting, and audio. With that Hollywood look, audience engagement will be through the roof. However, creativity and skills are essential to making it pop even at this level.
At every budget, it’s not just about the gear. You must pair it with talent, vision, and dedication to your craft.
The better the gear, the higher the potential – but only if you bring that A-game creativity. Invest wisely based on your goals and skills.
Tips for Scaling Your Studio Setup
When starting their YouTube journey, creators often have essential gear.
As their channels grow, they need better equipment to meet their evolving needs. Brilliant creators assess their content and identify the necessary upgrades.
Many upgrade to a Sony ZV-1 camera with a Sigma lens for talking head videos, a ring light for better appearance, and a Rode mic for crisp audio.
A Manfrotto tripod keeps shots steady, and Adobe Premiere Pro, a powerful video editing software, simplifies editing. The key is understanding requirements and investing in gear to handle more complex projects as channels evolve.
Initially, setups are essential, but channel growth demands improvements. Creators evaluate their videos and gear, prioritizing high-impact upgrades like lighting, which can instantly make videos look professional. Forward-thinking creators plan for future content, like interviews, and invest in quality mics.
With tight budgets, they choose gear offering the most value.
As channels explode, ideas outpace time, and tech tasks can overwhelm, affecting content quality.
At this stage, intelligent creators may opt for professional video editing services like Vidpros. These services enhance setups and improve raw footage, allowing creators to concentrate on producing great content.
The advice?
Begin with DIY to learn the essentials, but feel free to get professional help as channels grow.
This intelligent move allows creators to concentrate on what they do best while leaving the technical aspects to the experts.
What YouTube Studios Will Look Like in the Future
When creators first started on YouTube, it was all about having a decent camera.
Now, the game is rapidly changing with the introduction of AI tools that can automatically edit videos, spot promising segments, and make professional-looking edits. YouTube is also rolling out 8K video resolution and Dream Screen technology that can virtually transport creators to any location without green screens.
The new YouTube app is a complete studio in your pocket, and AI can analyze viewer preferences to provide insights, enabling creators to produce content their audience will love.
AI isn’t replacing human creators; it’s supercharging them, allowing them to focus on creativity while technology handles the rest.
Studios are evolving into modular, environmentally friendly spaces that can adapt to different content trends. Future setups will increasingly utilize natural light to create a professional look and reduce eye strain and fatigue.
They feature autonomous lights and cameras that sync with editing software, sound-dampening walls for clear audio, and dedicated areas for team collaboration, all while incorporating the creator’s branding.
Capping Off
We explored three budget tiers for YouTube studio setups:
$100 Setup: Use your smartphone with affordable accessories for impressive content on a shoestring budget.
$1,000 Setup: Step up with semi-pro gear like the Sony ZV-1, Elgato lights, and Rode mics for a polished, high-quality look.
$10,000 Setup: Invest in cinema-level equipment like Sony A7 IV, pro lighting, broadcast audio, and advanced editing rigs.
While gear is necessary, your passion, creativity, skills, and sound quality are equally crucial for outstanding videos. You can engage audiences at any budget level with the right mindset and effort.
Creativity shines at any budget, but professional editing can take your videos to the next level.
Share your setup in the comments, and if you need that extra polish, reach out to Vidpros. Their expert video editing services will help your YouTube content captivate audiences and stand out.